How to Set Up the NETUM C750 for Inv. Audits

The NETUM C750 is a powerful and affordable scanner capable of storing a list of barcodes scanned directly within its internal memory. This gives you the freedom to walk around and audit items without worrying if you are still in the Bluetooth range of your device. This article will walk you through how to set up your NETUM C750 as well as how you will export the list of barcodes to a document after completing the audit.
Note: Within the article "Device" refers to any computer or tablet that can connect to the scanner and support a text file (such as Microsoft Word, Google Docs, Notepad, Notes...)
You can purchase a NETUM C750 using any of the links below:
Follow the steps below to set up your NETUM C750:
- Remove the NETUM C750 from the packaging and turn it on using the on/off switch found on the bottom of the scanner.
- Depending on how you want to use the scanner you can set it up to use one of the three connection methods:
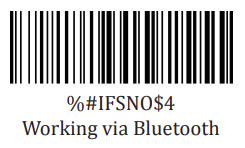
- Bluetooth: This will allow you to pair and connect the scanner to your device using Bluetooth. Scan the code below with your scanner to enable Bluetooth mode:
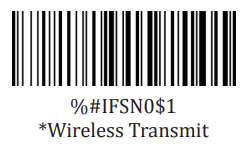
- Wireless USB Dongle: This mode will allow you to wirelessly connect to the scanner using a USB dongle that is plugged into your device. Scan the code below with your scanner to enable wireless USB dongle mode:
- Wired USB Cable: This mode will require you to physically plug in your scanner to your device using the provided USB-C cable that was included with your NETUM C750 scanner. This mode will be enabled by default when your scanner is plugged into the USB-C cable.
- Bluetooth: This will allow you to pair and connect the scanner to your device using Bluetooth. Scan the code below with your scanner to enable Bluetooth mode:
- Once you have configured how you would like your scanner to communicate with your device, you have the option to either set up the scanner to instantly send barcodes that are scanned to your device OR utilize the scanner's internal memory to scan a group of barcodes and send them to your device all at once.
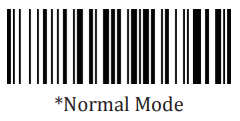
- Instantly Send Barcodes: Scan the code below to instantly send all barcodes to your connected device. Note, that this mode does not use the internal storage to store any barcodes and will act more like a keyboard for your connected device.
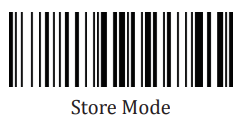
- Internal Storage Method: Scan the code below to enable to scanner's internal storage. When in this mode the scanner will save all barcodes scanned to its internal memory to be exported all at once after the audit is complete.
- Instantly Send Barcodes: Scan the code below to instantly send all barcodes to your connected device. Note, that this mode does not use the internal storage to store any barcodes and will act more like a keyboard for your connected device.
Your scanner is now set up and ready to be used for audits. If you are using the "Instantly Send Barcodes" method, CLICK HERE to learn how to perform an audit using this scanning method
If you instead chose to utilize the scanner's internal memory Follow the steps below to export the data to your connected device once your audit is complete. For additional information on how to complete an audit using a scanner with internal memory CLICK HERE
- After completing your audit using the scanner, open up a text document on your connected device (such as Microsoft Word, Google Docs, Notepad, Notes...)
- Ensure that your cursor is in the document, then scan the code below to instantly transfer all scanned barcodes into your text document.

- Once you have exported all barcodes to your text document follow the instructions found HERE to learn how to complete the audit
- Lastly, scan the barcode below to clear out the barcodes saved to the internal memory of your scanner so it is ready to be used in the next audit.

For additional assistance please reach out to POSaBIT support @ 1 (855) POSaBIT OR SUPPORT@POSaBIT.COM