POSaBIT Menu Overview

POSaBIT Menu Overview
In the article below, there is a breakdown of how to set up the new POSaBIT Menu, including general menu settings, category configurations, menu banners, and more!
How to Set Up a POSaBIT Menu
- Log in to the POSaBIT POS Portal
- Navigate to the Inventory tab --> Select Menu Feeds
- Click the green New POSaBIT V2 Menu button on the top right

- Fill out the menu options:
- Name
- Mode: Online vs In-store (Kiosk)
- Feed Key: this is the menu's feed key
- Ecommerce URL: This is where you put the menu URL after completing the CNAME record steps.
- Analytics Provider (Optional): Select if you use Google Analytics or Google Tag Manager.
- Analytics ID (Optional): If you selected a provider, add your provider's ID to connect your menu to your analytics software.
- Active: Select this to enable this menu
- Ecommerce Menu: Enable this if this is used as an online menu.
- Combine Weight Variants: When this flag is enabled, a product with multiple weight variants will be displayed as one single product card on the menu. When this flag is disabled, a product with multiple weight variants will be displayed as separate product cards on the menu.
- Add Age Gate to Menu: When this flag is enabled, Confirmation of age is required to view the menu. If your site already has an age gate in place, you can disable this setting.
- Menu Store Display Name
- This is the name shown for the location selection drop-down that is displayed on the menu banner. If you have multiple locations, you will want to include the location name in this display name.
- Description: This is for your own internal use only.
- Primary Color: this color will be used for the icons on the menu (Home, Filter, Search, Add to cart, etc.) and a few other minor places within the menu.
- Secondary Color: This color will be used for the discount price & percentage, along with a portion of the text on the menu.
- Favicon: Icon that will display on the tab when open on a browser
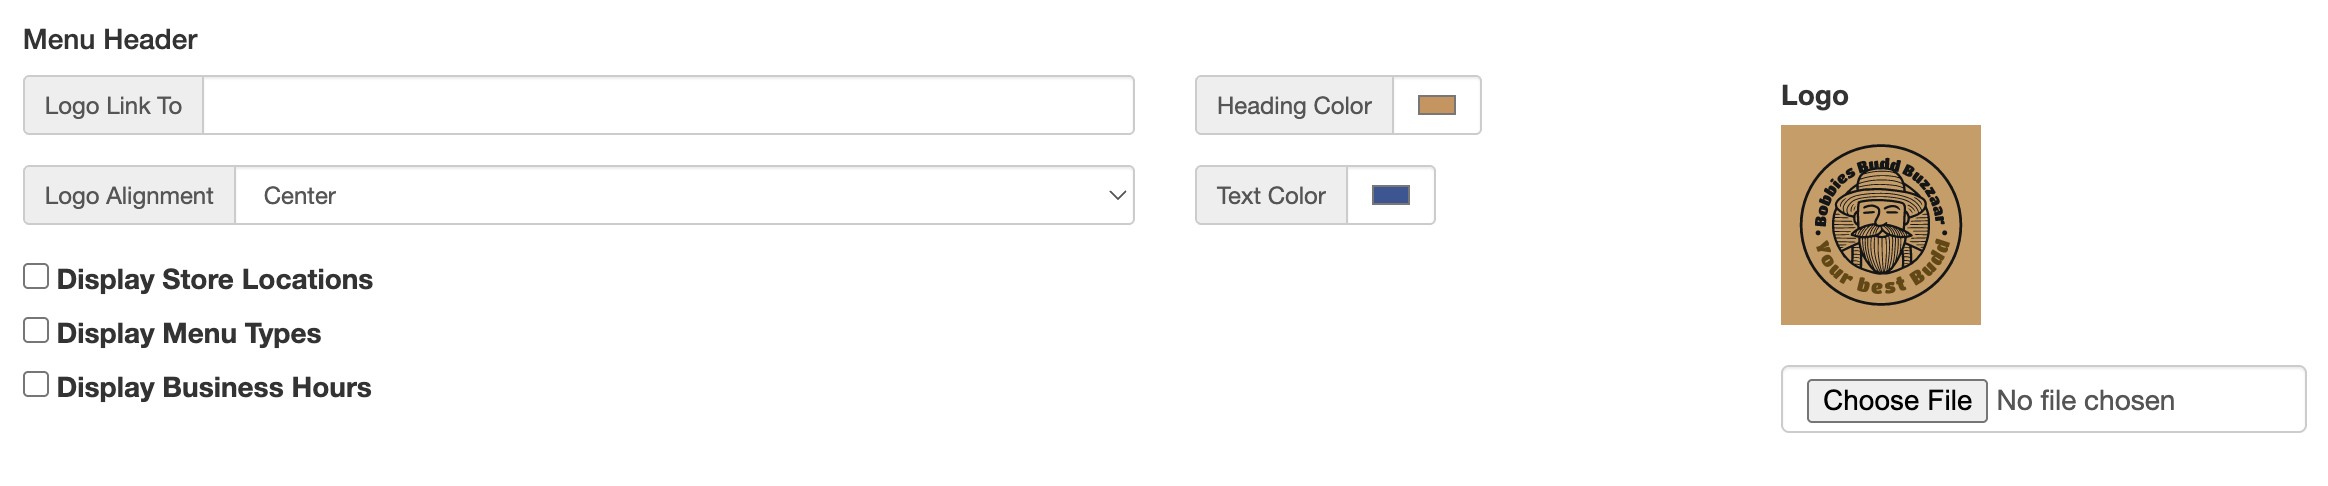
- Menu Header options:
- Log: Upload your logo here
- Logo Link To: Where you want this logo displayed. We suggest this be linked to your main domain/website home page.
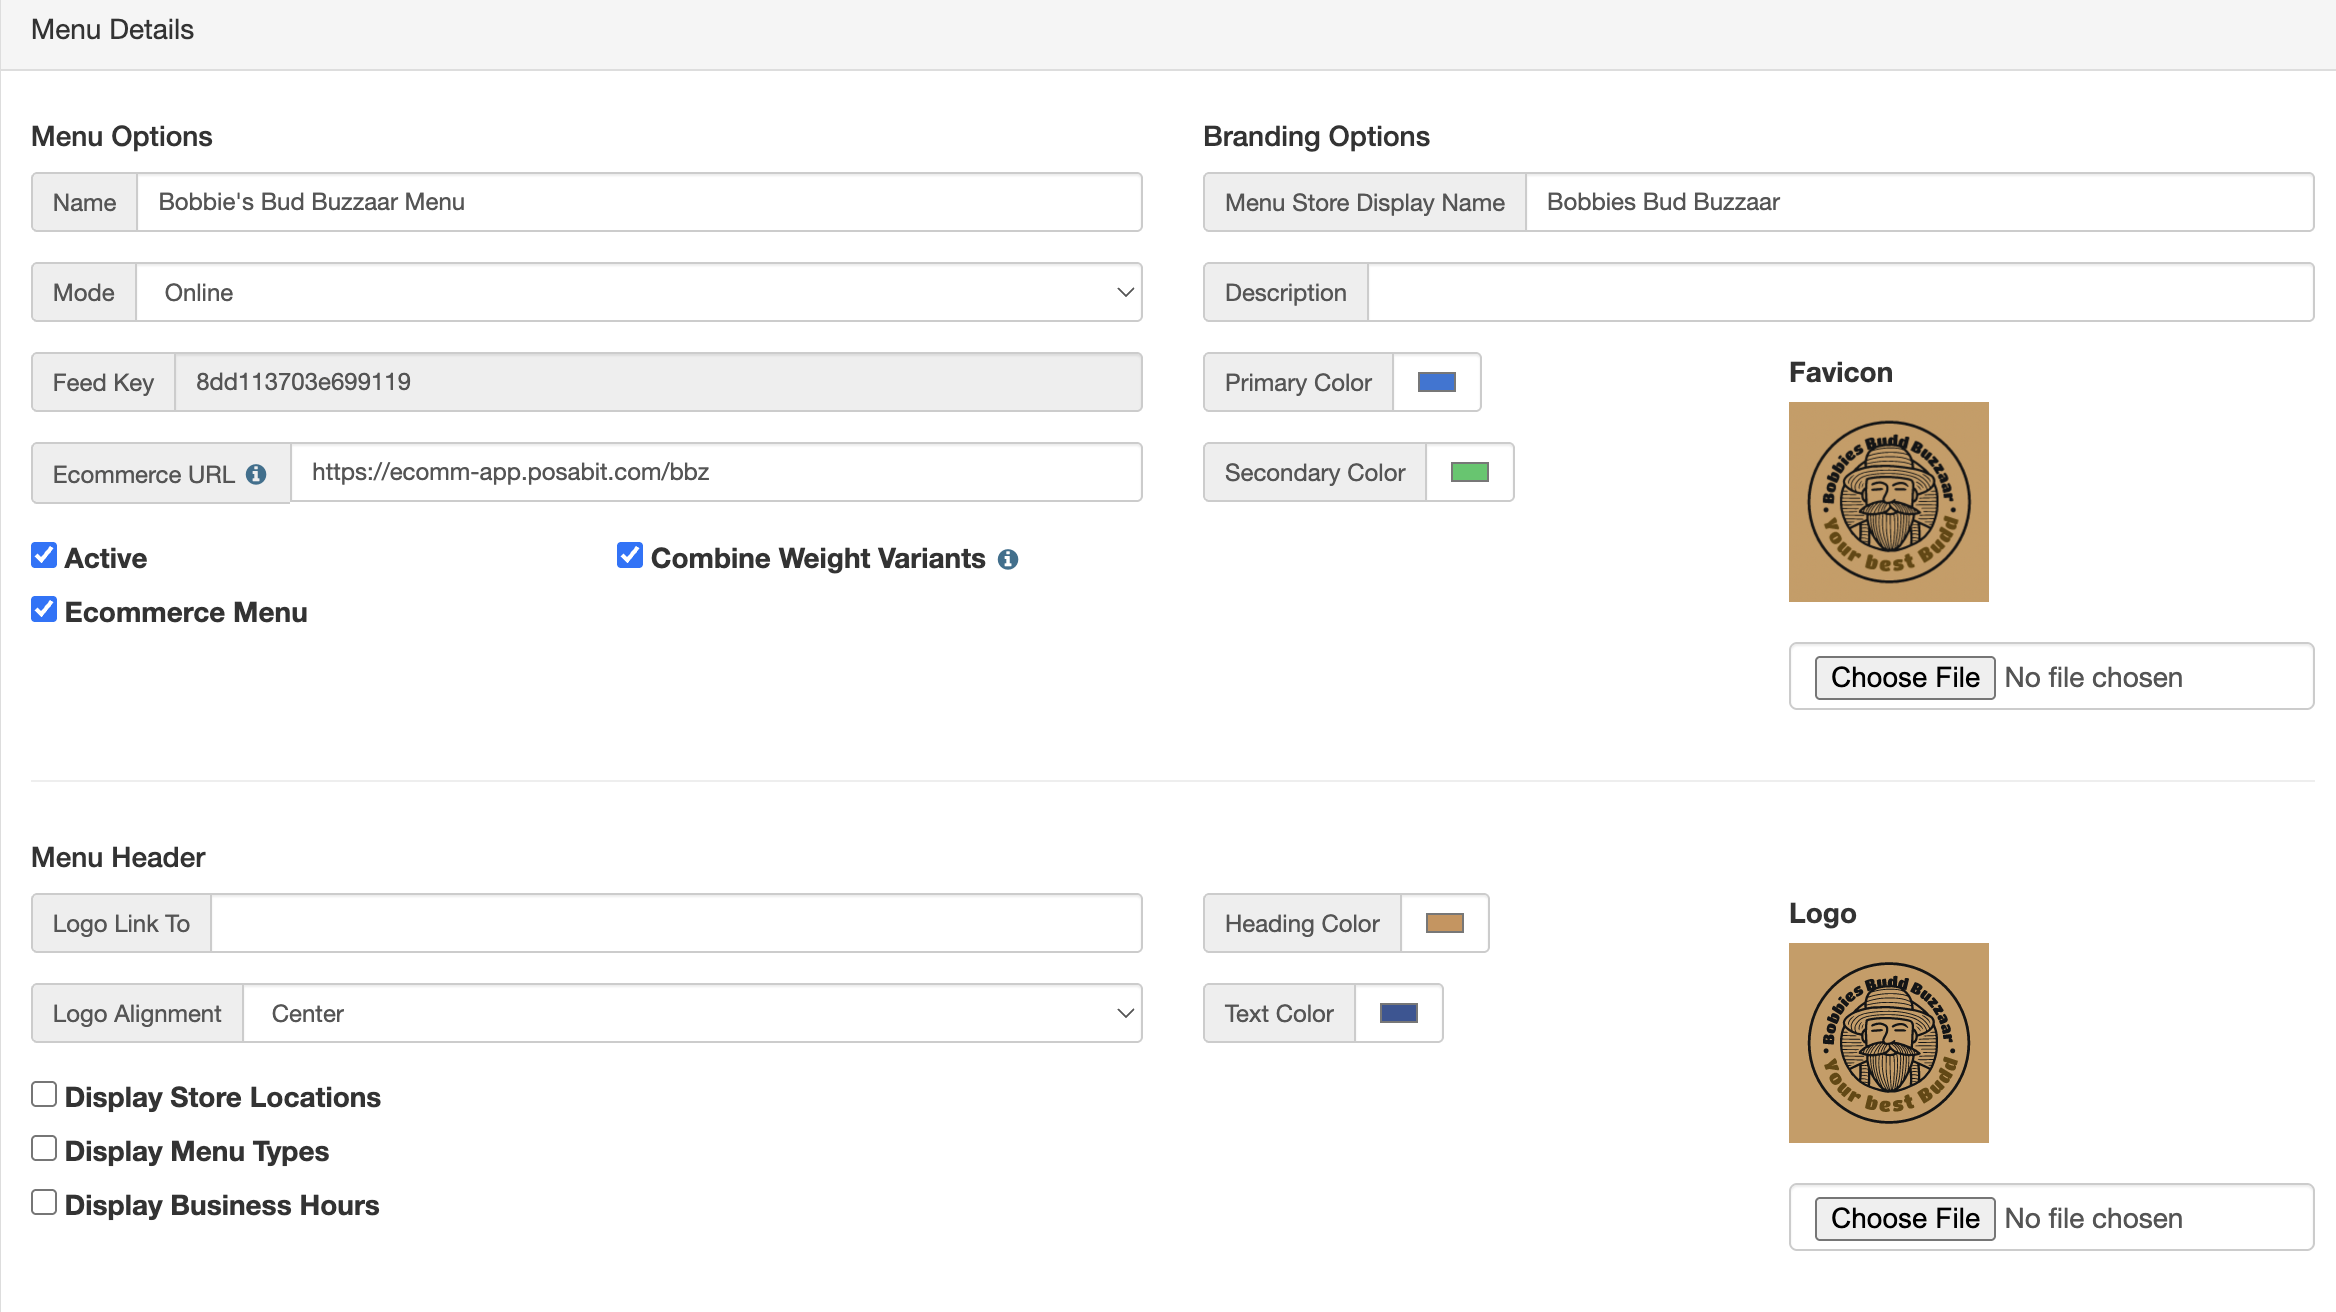
- Logo Alignment: This determines if the logo will display on the left, right, or center
- Heading Color: This is the color of the header on the menu
- Text Color: This is used for some of the text on the menu
- Display Store Locations: This will display your store locations on the top of your menu when enabled
- Display Menu Types: Rec menu & Med menu dropdown option. ONLY enable this if you are licensed for both Med & Rec.
- Display Business Hours: When enabled, this will show your store hours on the top of the menu
- Menu Toolbar: these flags control the visibility of each toolbar item. Learn more about these three optional pages HERE.
- Display Categories button on toolbar: If enabled, the categories page will be visible & accessible on the menu. The categories page provides a list of categories created within the home page configuration for easier user navigation.
- Display Brand button on toolbar: If enabled, the brands page will be visible & accessible on the menu. The brands page provides a list of brands available at your venue, allowing users to easily filter the menu and view products from a specific brand.
- Display Deals button on toolbar: If enabled, the deals page will be visible & accessible on the menu. The deals page provides a list of "discounts" available at your venue, allowing users to easily filter the menu and see a list of products that fit within a certain discounts criteria.
- Payment Options: these are the payment options that will be displayed on the checkout
- Cash
- Debit Card: Enable if your store accepts debit cards
- POSaBIT Pay: Enable if your store uses POSaBIT Pay
Note: The friendly names will appear when your customers pick a payment type on the checkout page. For example, you could say 'Debit ($3.50 Fee)' - Test Results Display Options: you have the option of displaying different test results based on what you enable
- Display Test Results as Range instead of Single Value
- If enabled, it will display a range of results based on active lots that are sellable on the menu
- Display Flavors: Set these up under product details
- Display Effects: Set these up under product details
- Display Terpenes: Set these up under product details
- Display Terpene Compass
- The Strain Data Compass is part of a larger research effort called the Strain Data Project (SDP), from which this information was derived. SDP utilized data from thousands of tested cannabis samples. The data was analyzed and aggregated in order to discover similarities and differences between cannabis products. Each colored coded category is defined primarily by the most dominant terpene or combination of terpenes. This creates a signature shape on a radar chart. Learn more about the Strain Data Project.
Note: The Enable StrainDataProject flag must be enabled in the inventory settings for the SDP information to appear on the menu, in addition to the flag above.
- Display Test Results as Range instead of Single Value
- Display All Test Results
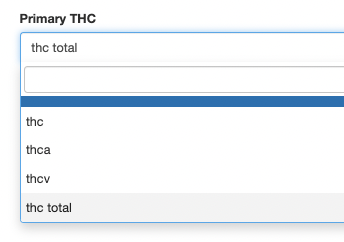
- Primary THC: this is the main THC type that displays below products on the menu. If a user clicks on the product details, they can view any ‘additional cannabinoids’ that has been included on the product details in the backend portal.
- THC
- THCA
- THCV
- THC Total
- Primary CBD: this is the CBD type that displays below products on the menu
- CBD
- CBDA
- CBDV
- CBC
- CBCA
- CBCV
- CBN
- CBG
- CBGA
- CBGV
- Cannabinoids: Select which Cannabinoids you would like displayed on products within your menu

- Save
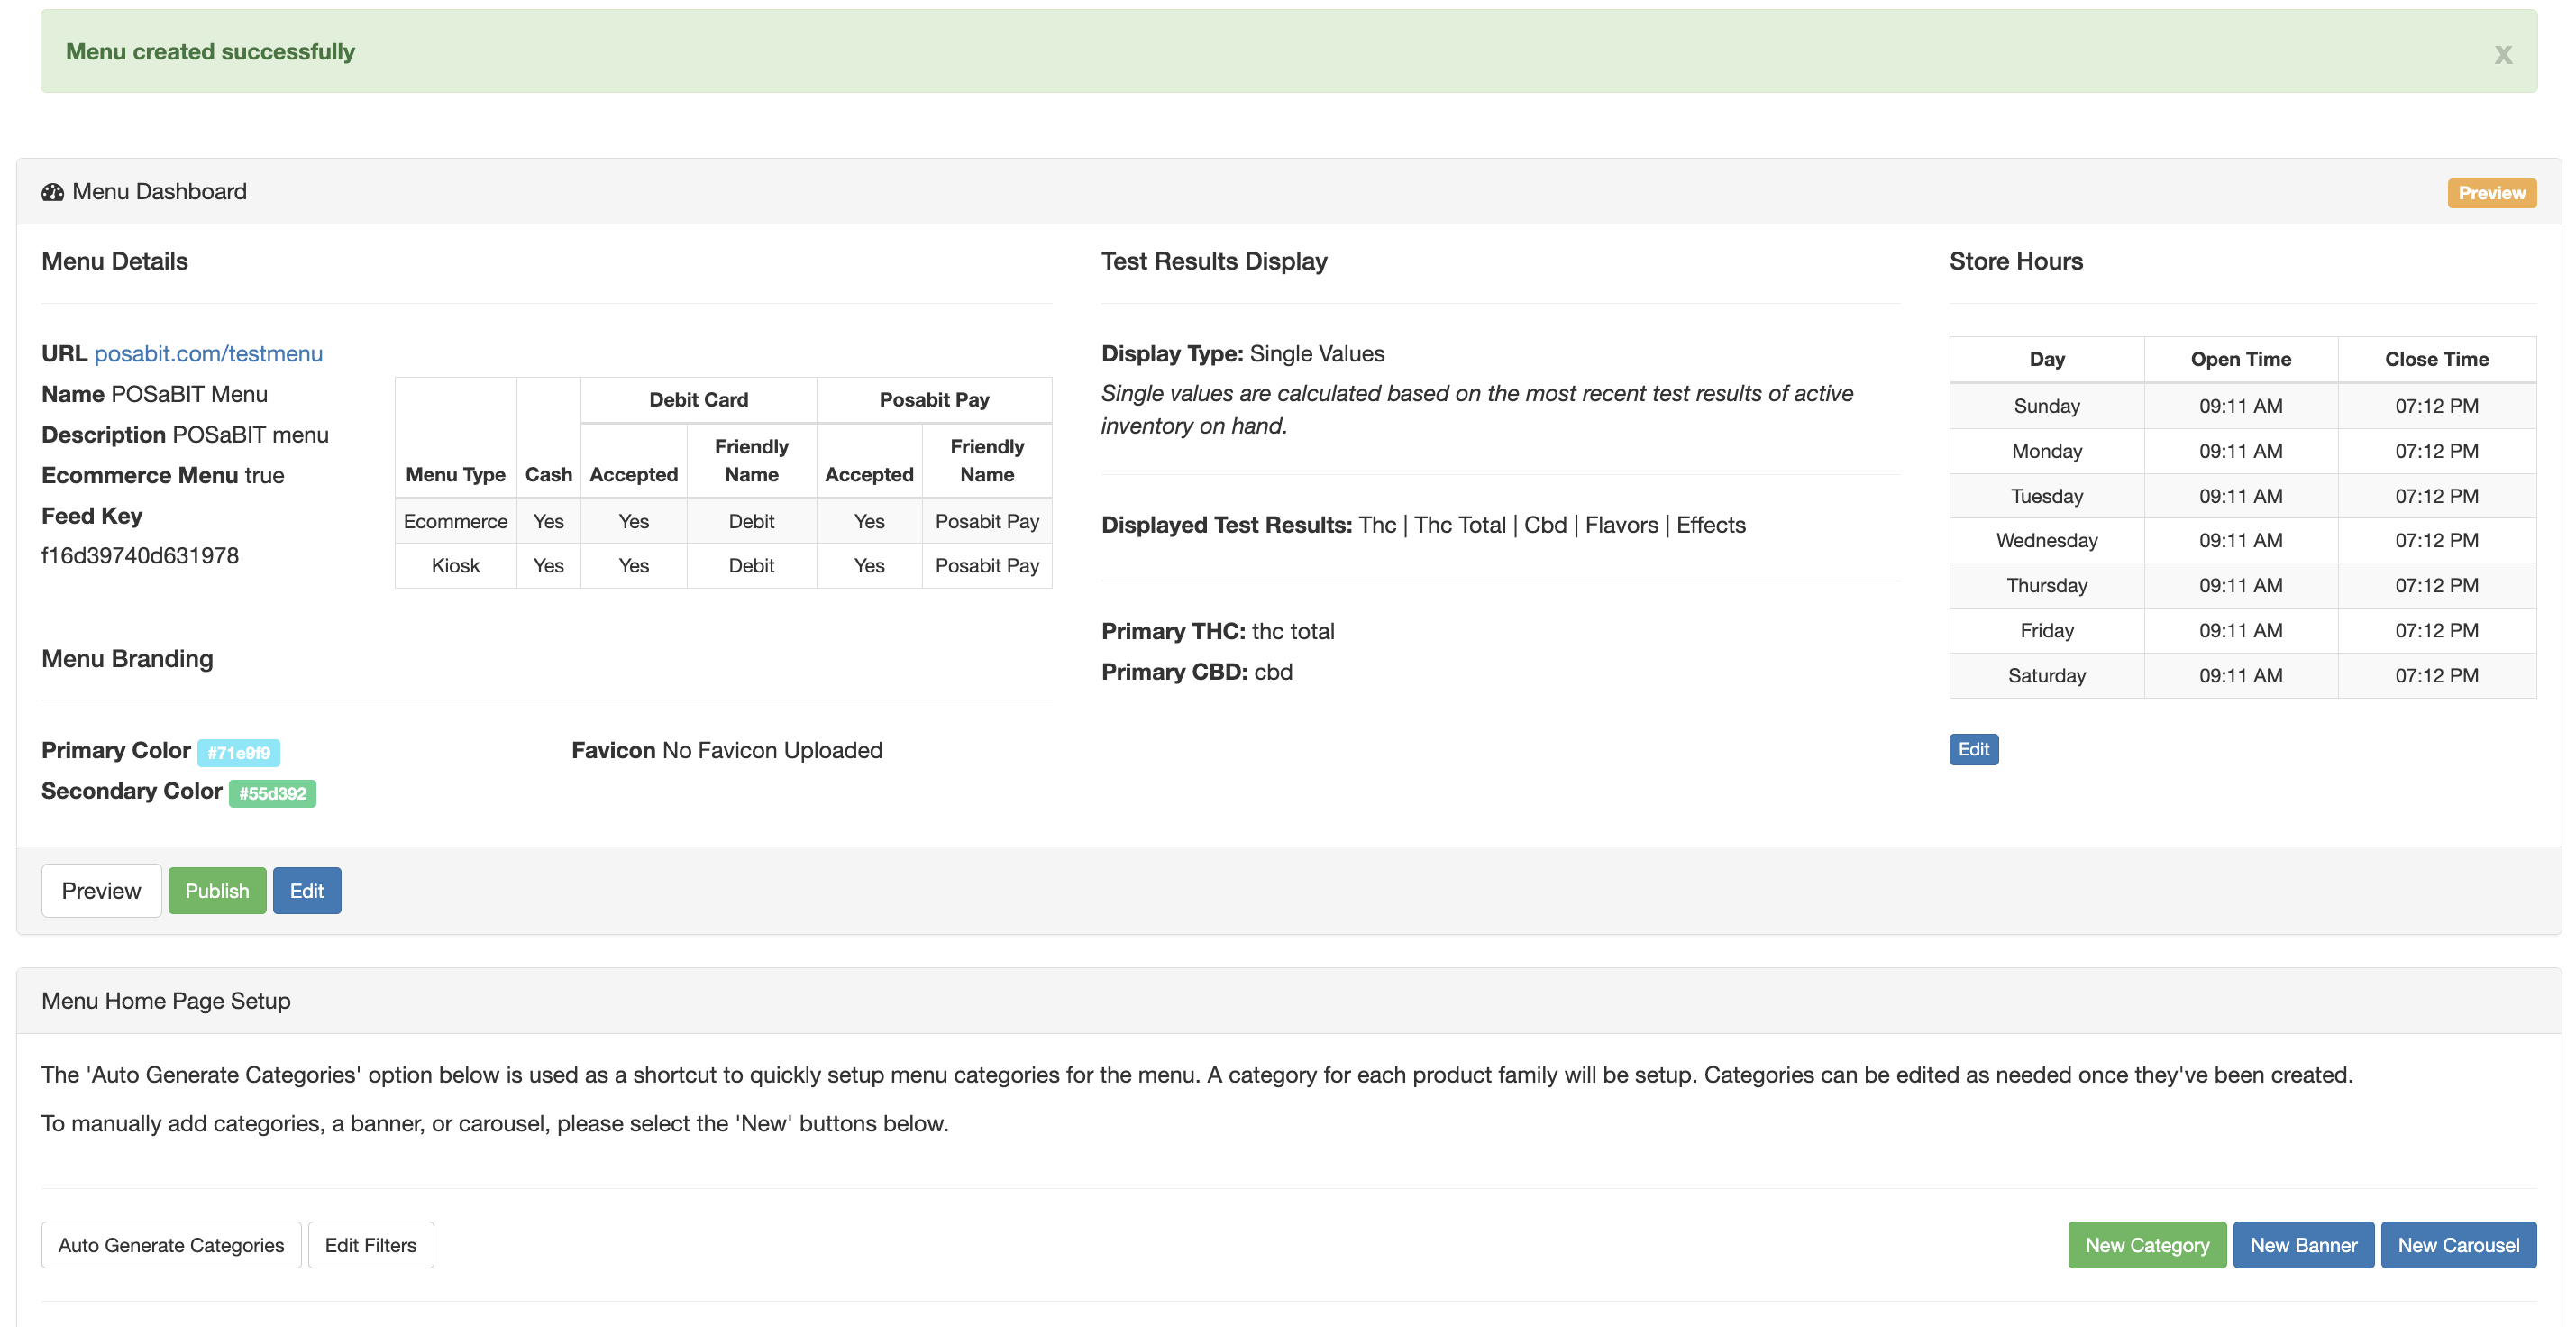
- You will be brought to the menu settings page and there will be a Menu Created Successfully pop-up at the top
General Menu Settings Walkthrough
Once you have created your menu, you will be brought to the Menu Dashboard. This is where you will edit an assortment of things to change the look and feel of your menu including adding categories, banners, image carousels to make the menu look exactly how you want it.
Category Configuration Overview (NEW)
Setting your categories is one of the most important steps to getting your menu up and running. This will determine how your menu looks as a whole.
- Log in to POSaBIT
- Navigate to the Inventory tab --> Select Menu Feeds
- Click Edit on the POSaBIT Menu you want to add categories to
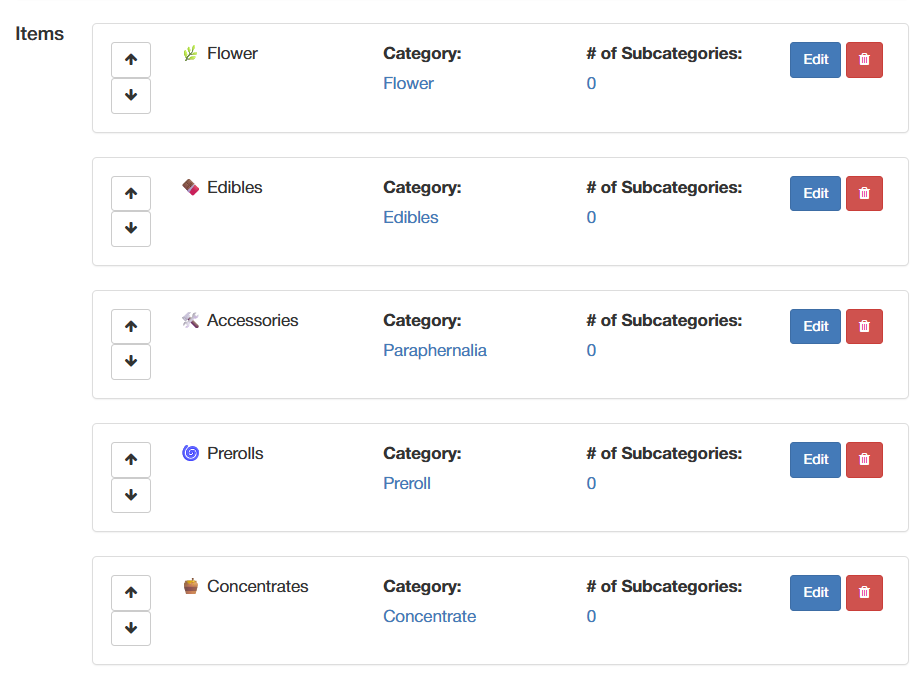
- From the Menu Dashboard, select the green New Category button on the lower right side of the page to manually create a category OR you can select "Edit" on one of the "Default" categories.Default Categories: When a new "Menu Feed" is created, POSaBIT will automatically pre-populate a basic shortcut item along with a list of categories that are based on "Product Families".

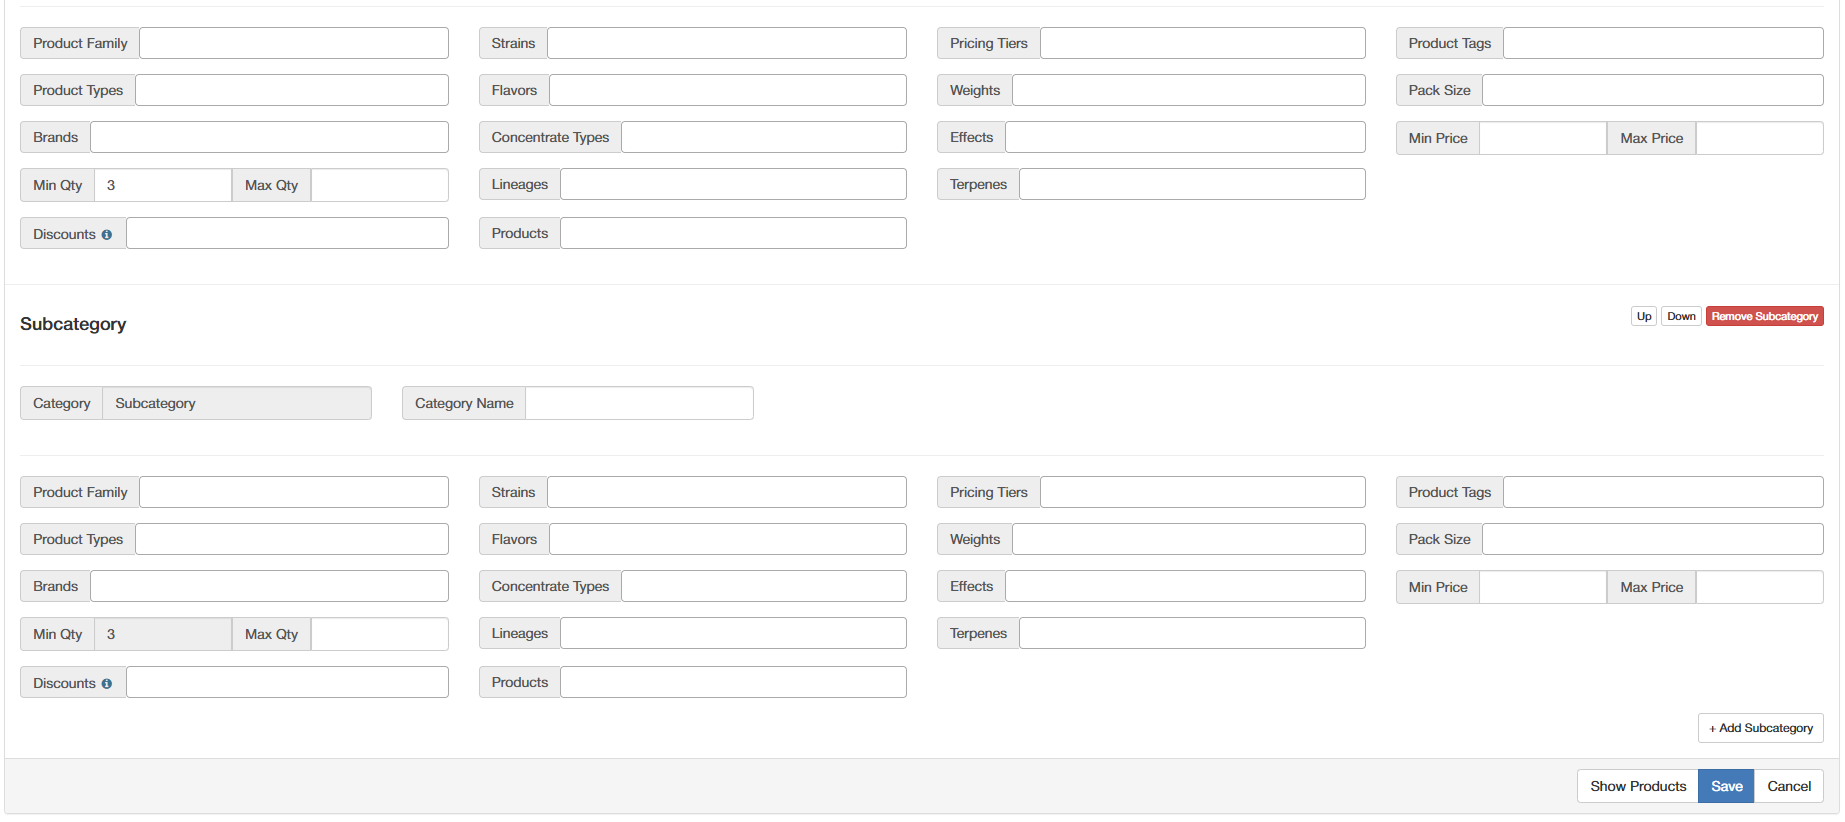
- If you choose to manually create categories, you will be brought to a Category Configuration page where you can specify the category. If you auto-generated your categories, clicking the Edit button to the right of each category will take you to the specific category configuration page.
- Category
- Category Name
- Display on Category Page (determines if the category you are creating should show up on the "Categories" page)
- Category Image (This is the image that will be used for this category on the "Categories" page)
- Description
- Description
- Min Qty / Max Qty
- Discounts
- Product Family
- Product Types
- Concentrate Types
- Lineages
- Products
- Strains
- Flavors
- Effects
- Terpenes
- Brands
- Weights
- Pack Size
- Min Price / Max Price
- DOH Compliant
- Product Tags
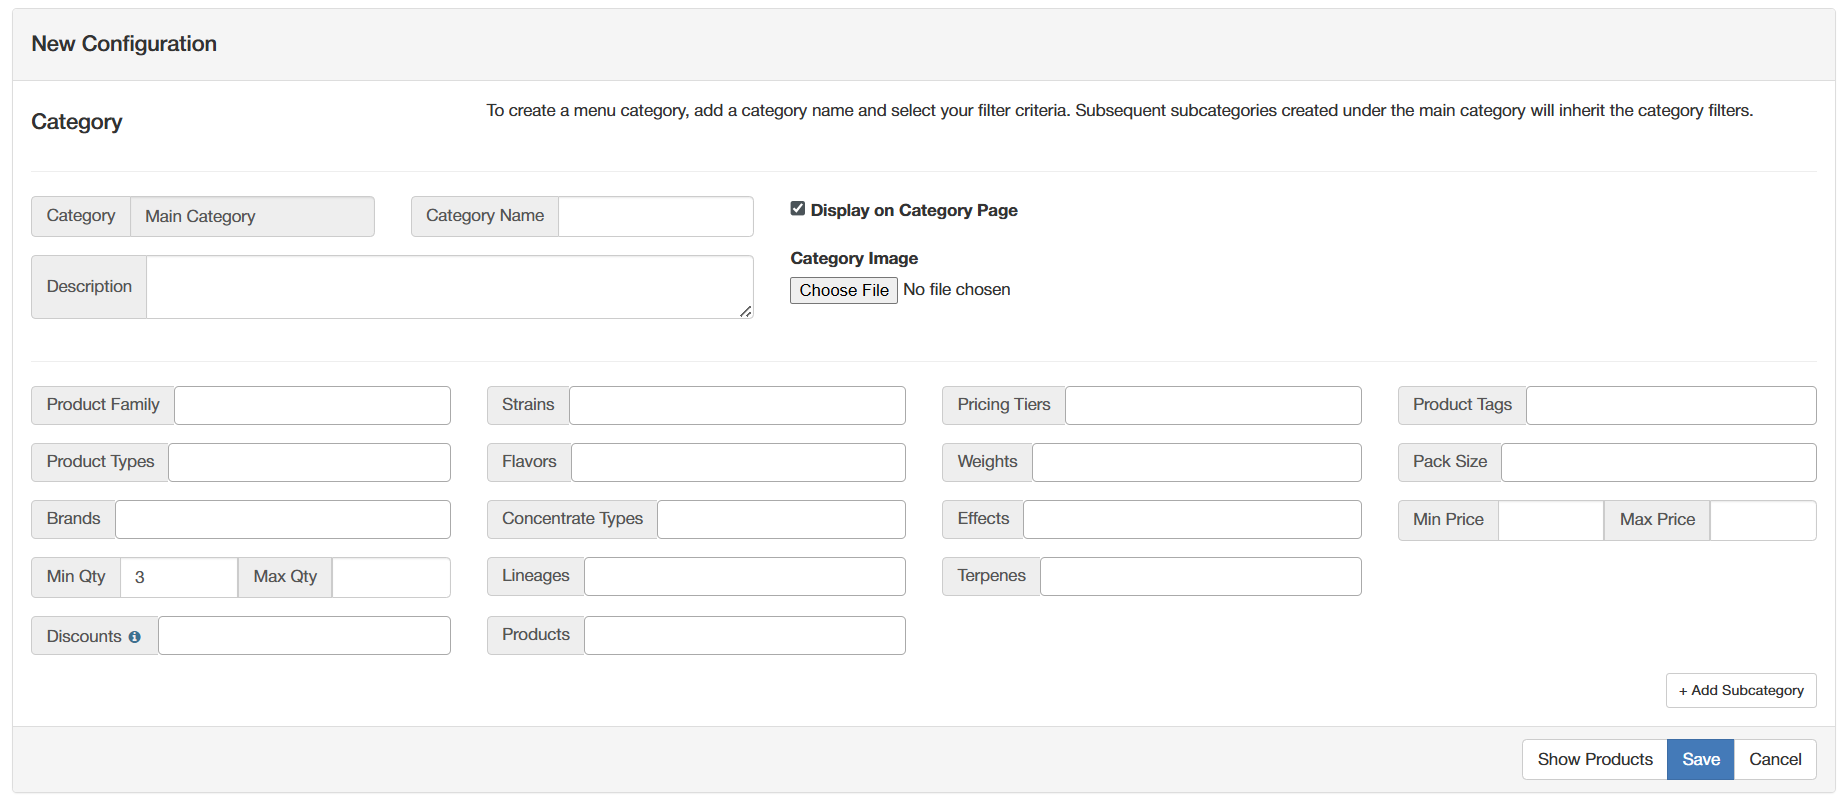
- Add a Subcategory (OPTIONAL)
- The subcategories appear when a user is filtering by category on the menu and is shown as a subcategory under the main category.
Shortcut Configuration Overview (NEW)
Setting your shortcuts is a key step to ensure users can navigate your menu with ease.
- From the Menu Dashboard, select the green New Shortcuts button on the lower right side of the page to manually create a new row of shortcuts OR you can select "Edit" on the "Default" shortcuts item that is created automatically.
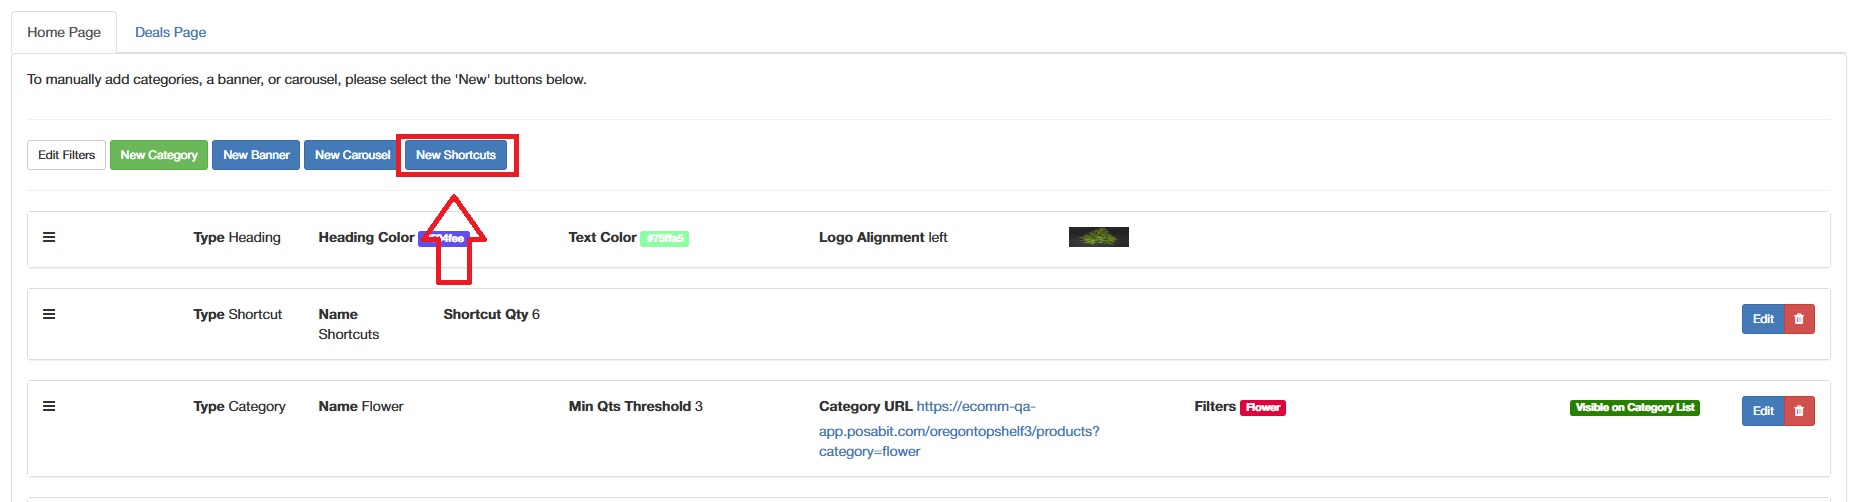
- Once you select "New Shortcuts" or "Edit" on the default shortcut item you will be taken to a page to configure what shortcuts should display on that specific line.
- In order to configure your shortcut, you will need to set the following:
- Shortcut "Title" (for your reference only)
- Shortcut button color
- Shortcut button Opacity
- Shortcut button text color
- Shortcut button text opacity
- Optional Settings:
- Active: Enable or disable this shortcut
- Generate Defaults: If enabled, upon pressing "Save", POSaBIT will generate 6 new generic default categories using product families on your menu as well as create corresponding default shortcuts for them. (Recommended for new menus only)
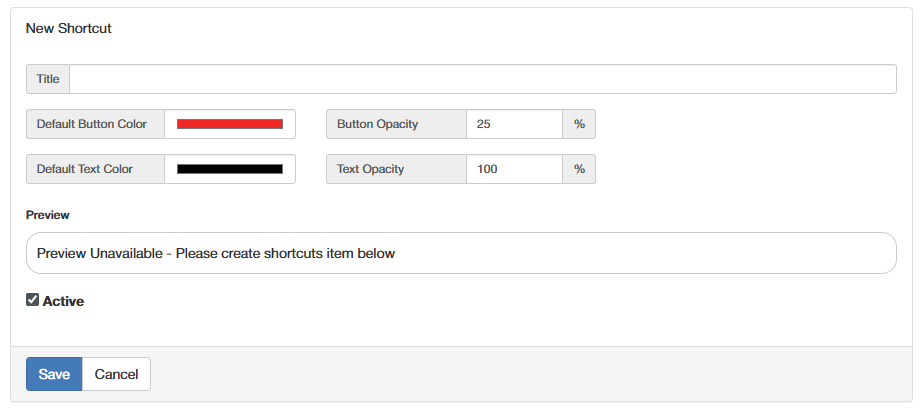
- Once you have configured the basics of your shortcut element, press "Save" to continue.
- At this time, you can make any adjustments to the button and text colors to find something that fits within your menu.If you enabled the "Generate Defaults" flag, you will see the 6 default categories populate automatically as shortcuts for the 6 new categories that are automatically generated.
If you left the "Generate Defaults" flag disabled, you will first need to create shortcuts using the steps below before you will see any shortcut items within the preview window.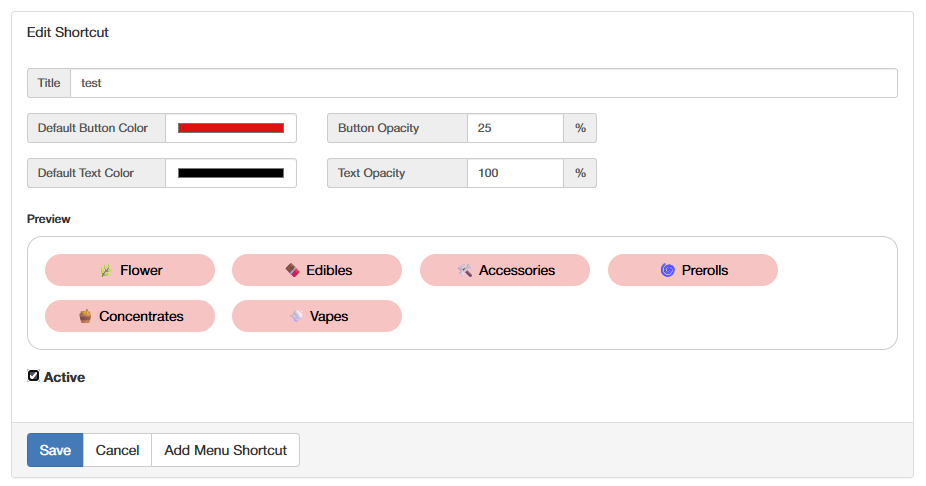
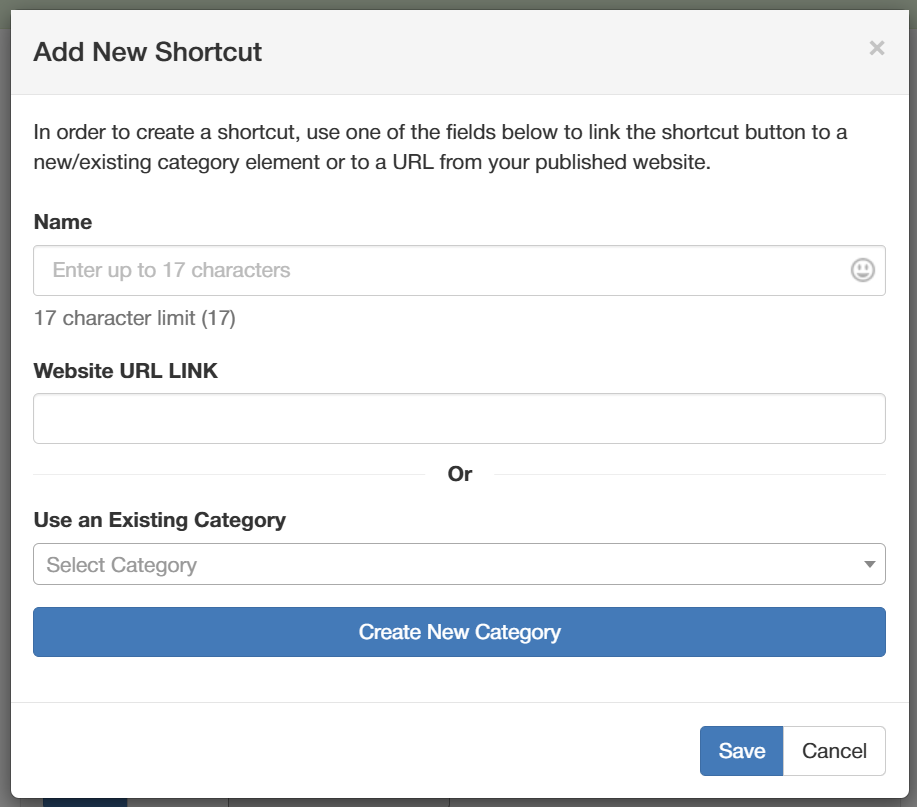
- To add a new shortcut button, select "Add Menu Shortcut"
- At this point, you will see a pop-up with the following fields:
- Name: This will be the name that is displayed on the shortcut (Max 17 characters including emoji's)
- LINK: You can set the link for the shortcut in one of two ways:
- Website URL Link: This field allows you to input any URL which the button will link to.
- Use an Existing Category: Instead of manually pasting a URL, this option allows you to select a category you have already created within your menu.You can also use the "Create New Category" button to create a new category directly from the shortcut creation page.
- Lastly, after you have created your shortcuts, use the "arrows" next to each shortcut to set the order in which you would like the shortcuts to appear.
- Once you are happy with the shortcut items & their order, press "Save" to create the new shortcut element on your home page.
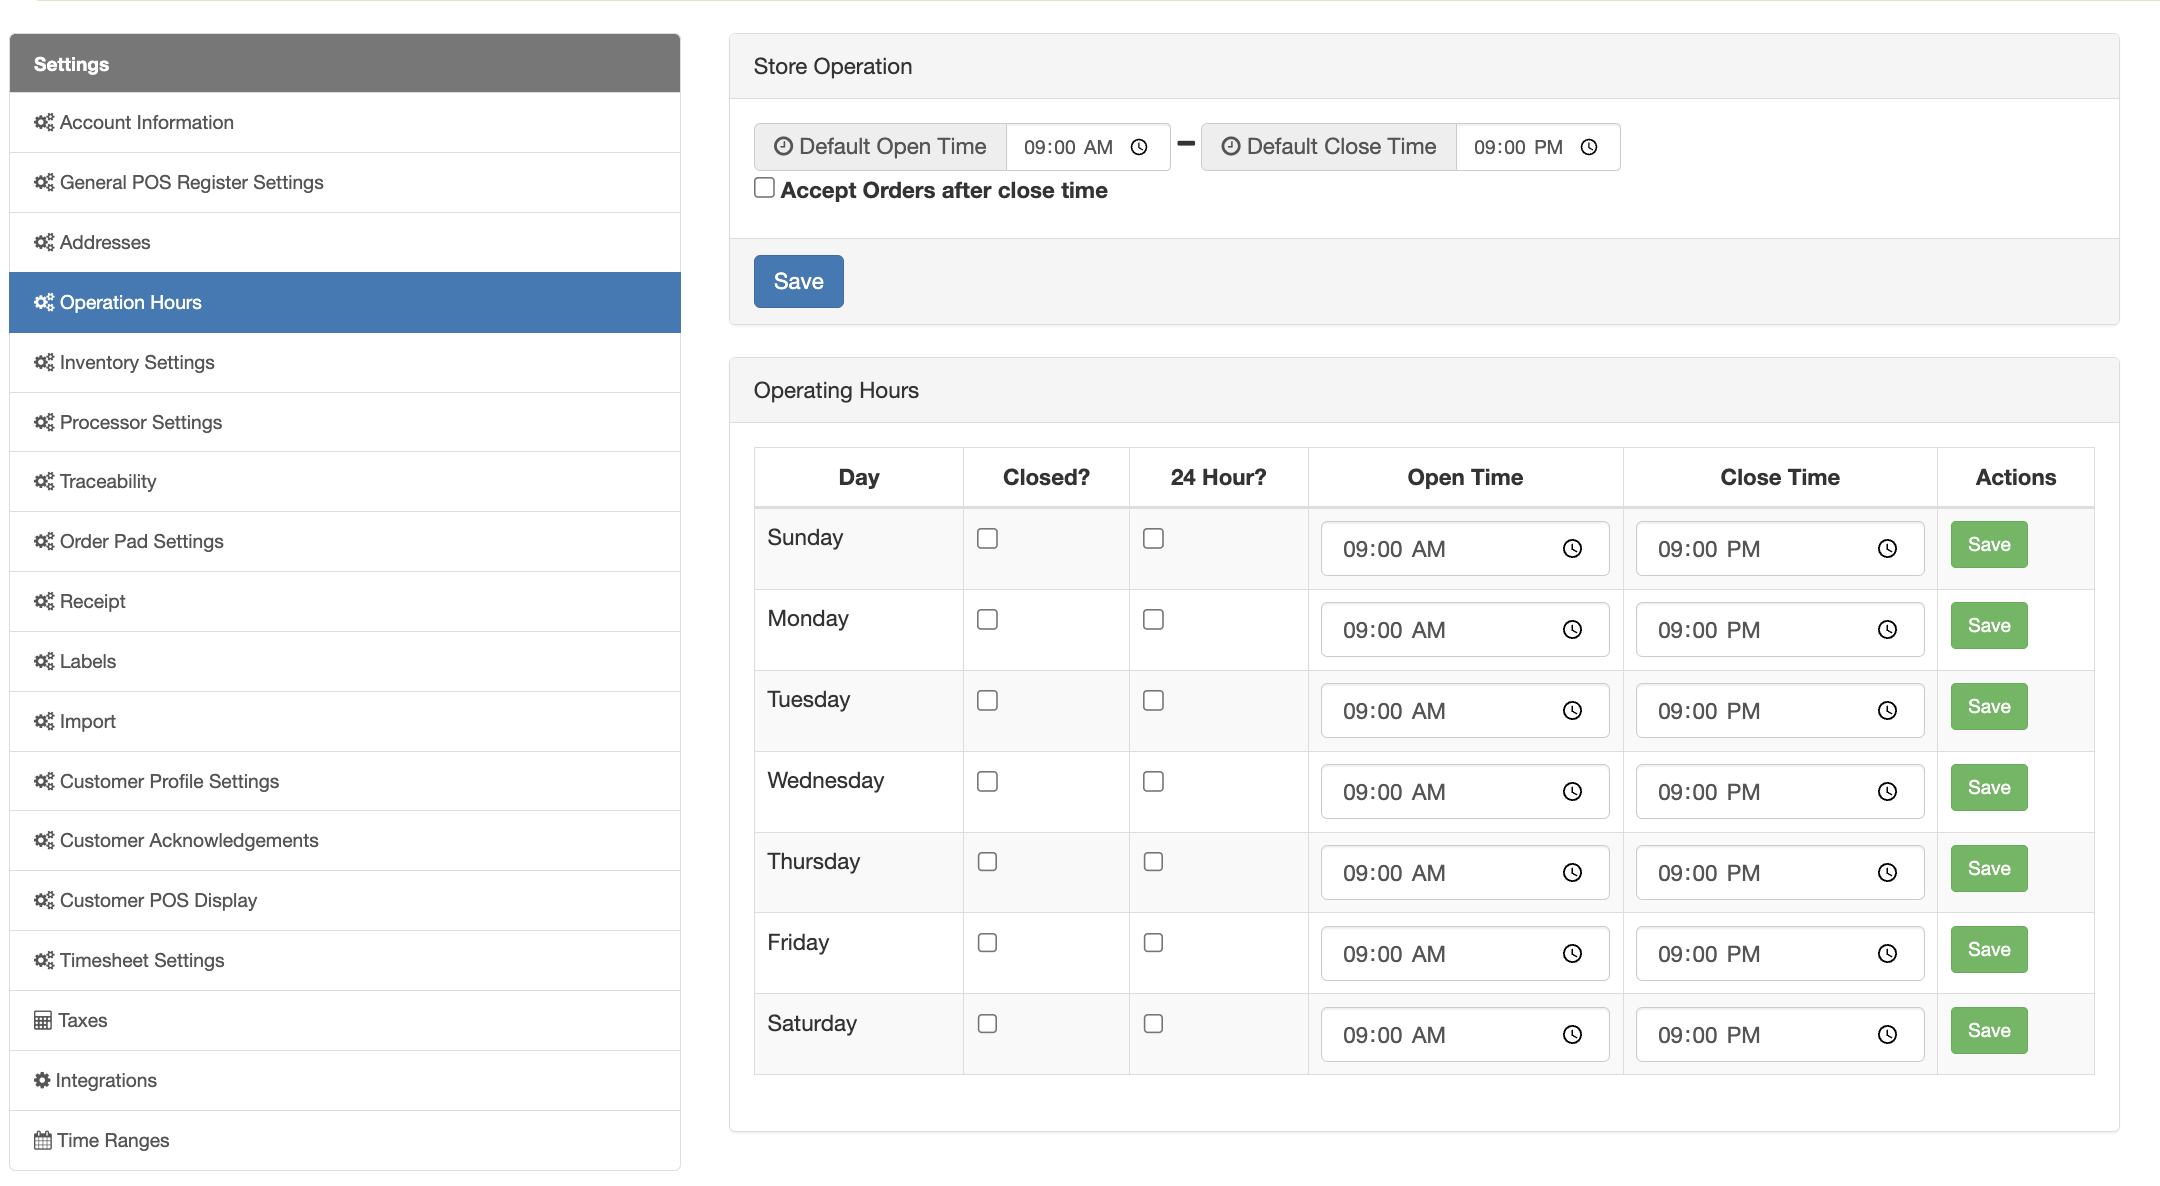
Updating your Store Hours
- On the right side, under the Store Hours, click Edit
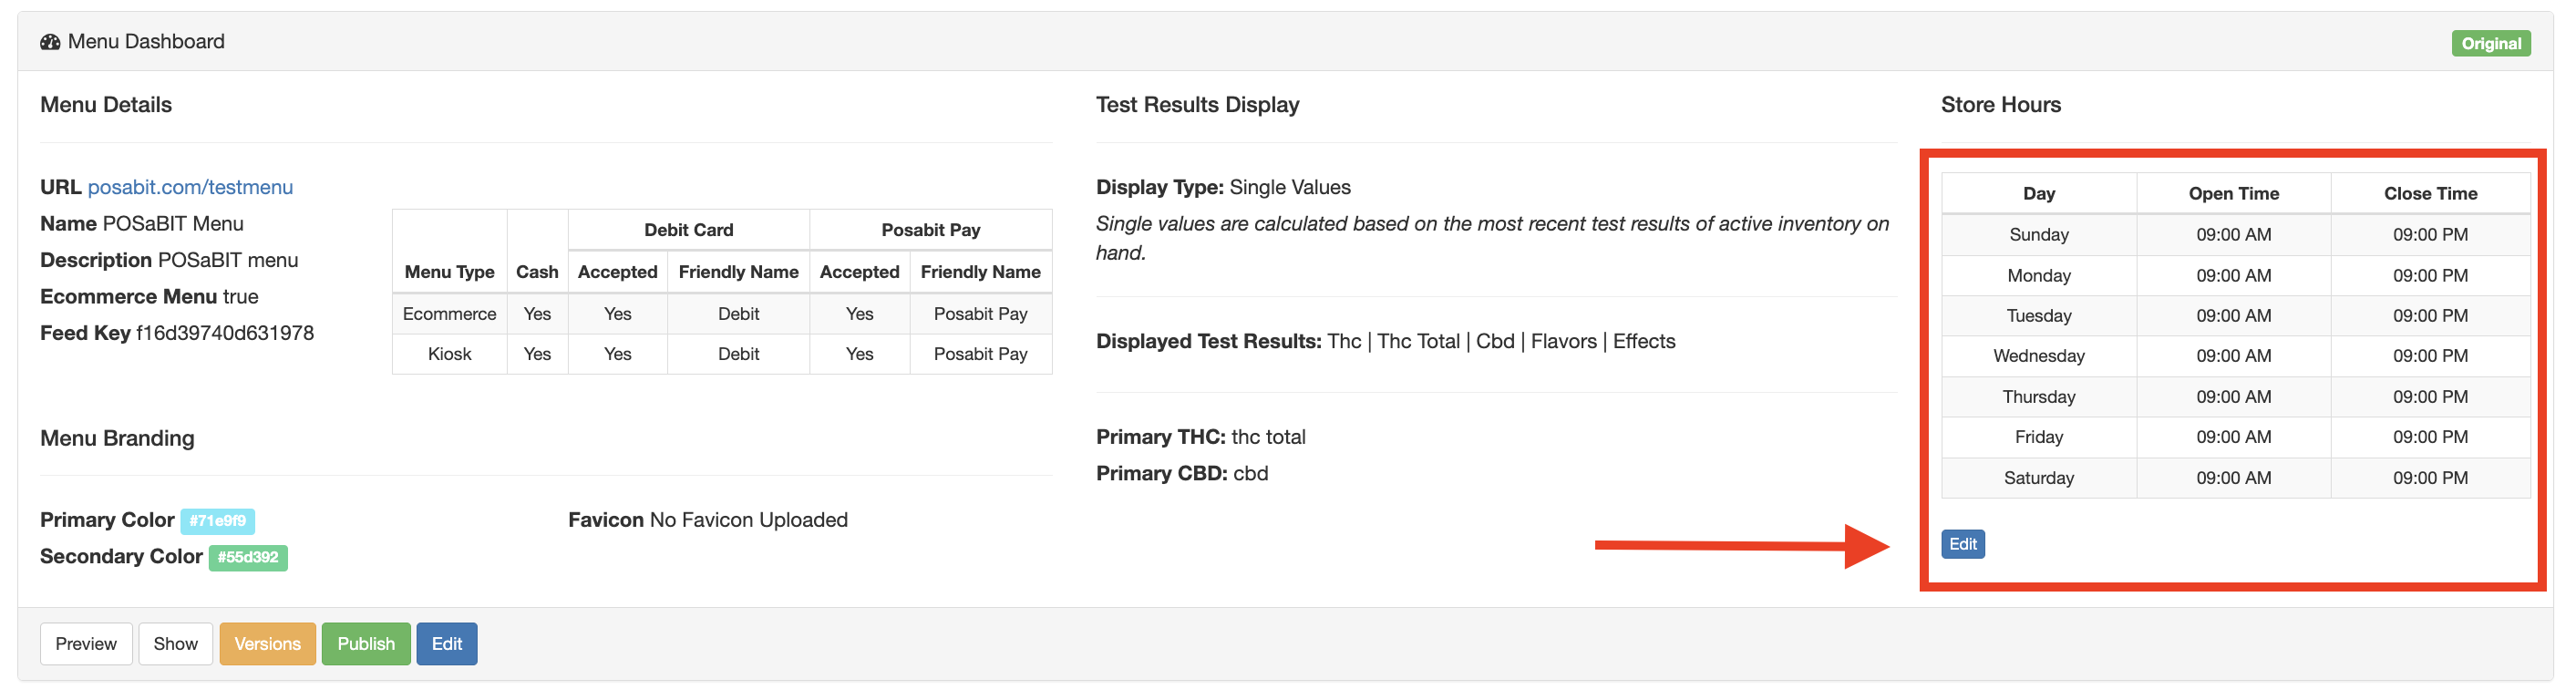
- You will be brought to the Operation Hours settings page under the general settings tab. You can set your default store hours and click Save which will update the daily operational hours. If you want to change your hours based on the day, update the hours for the days you'd like to change and click the green Save button on the right side of each day.
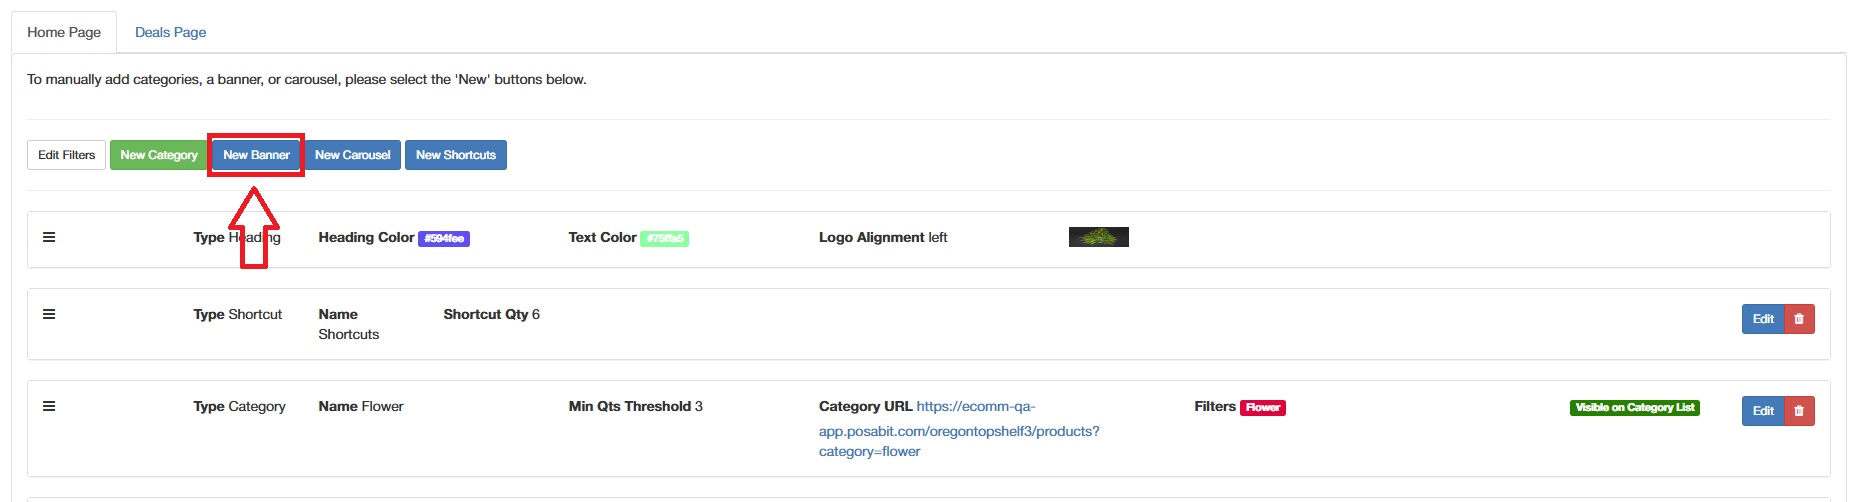
Edit Filters
Now towards the bottom of the Menu Dashboard, you will be able to setup custom filters to your liking.
- From the Menu Dashboard, select Edit Filters
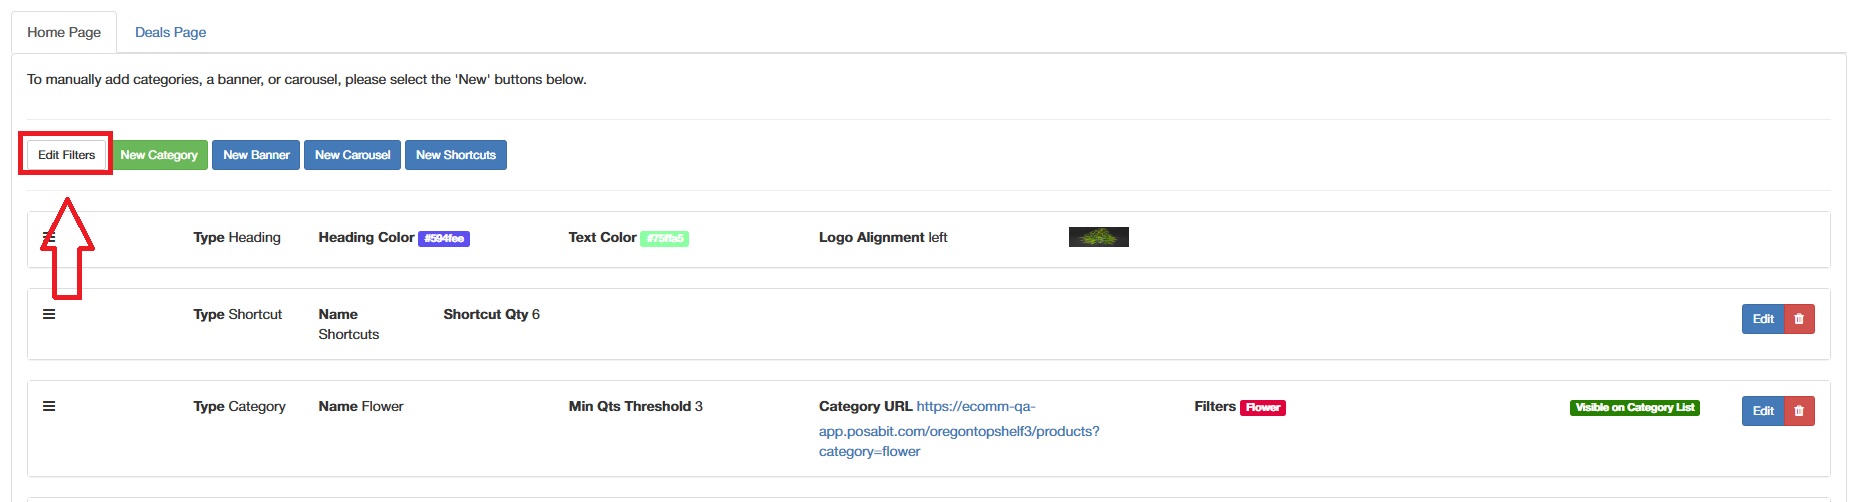
- From the Filters page, all filters will be pre-selected. Uncheck any filters that you would like to not display.
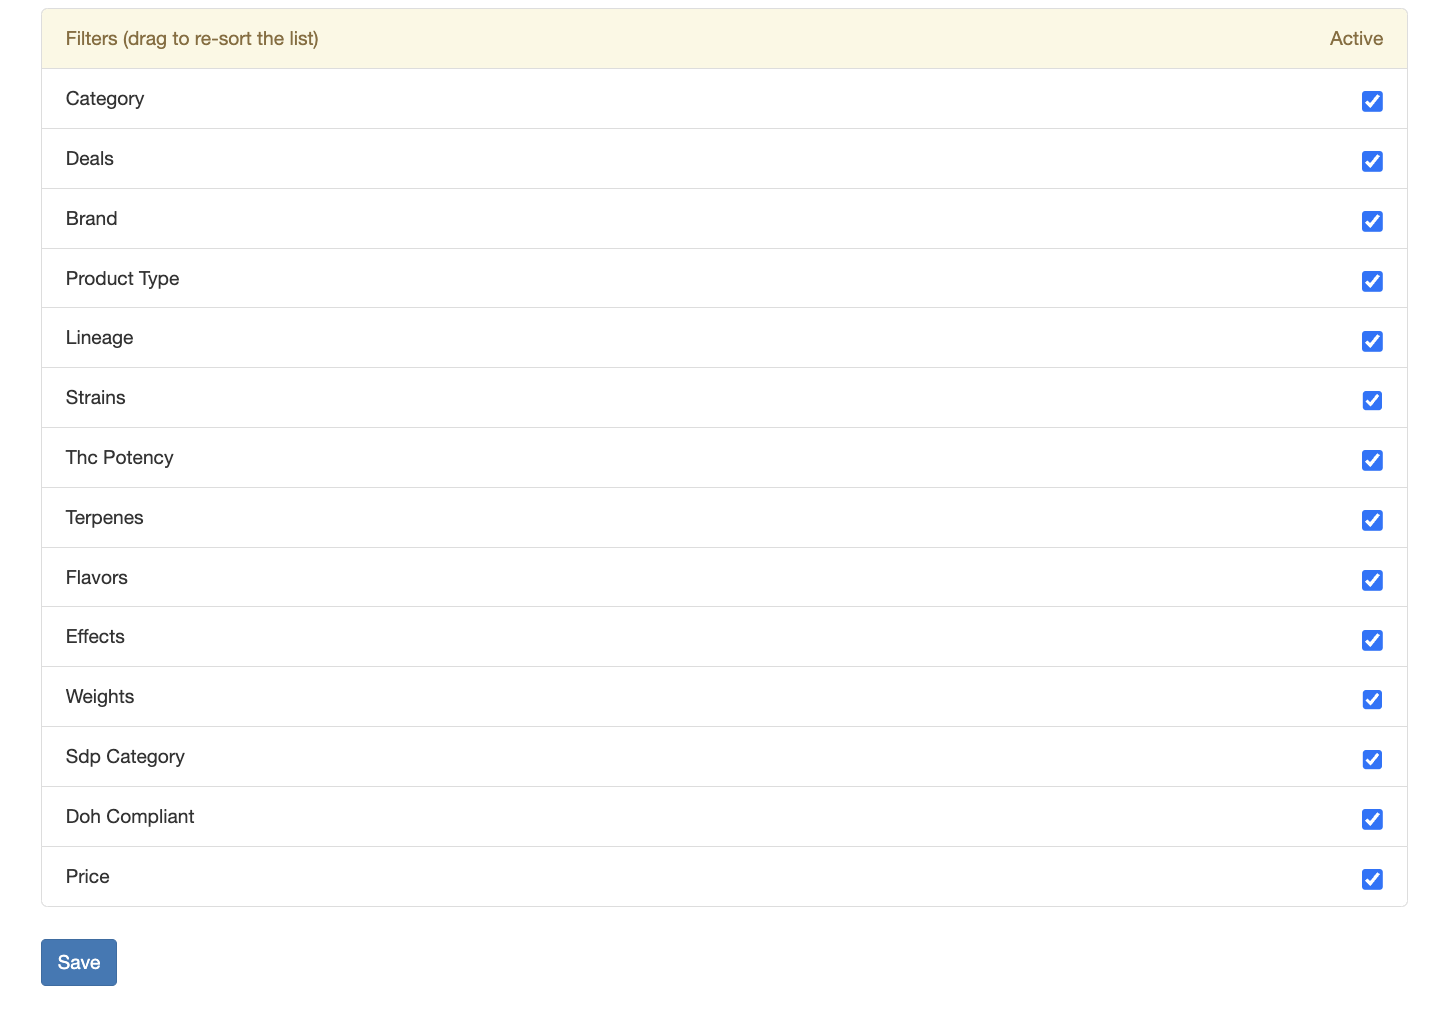
- Save
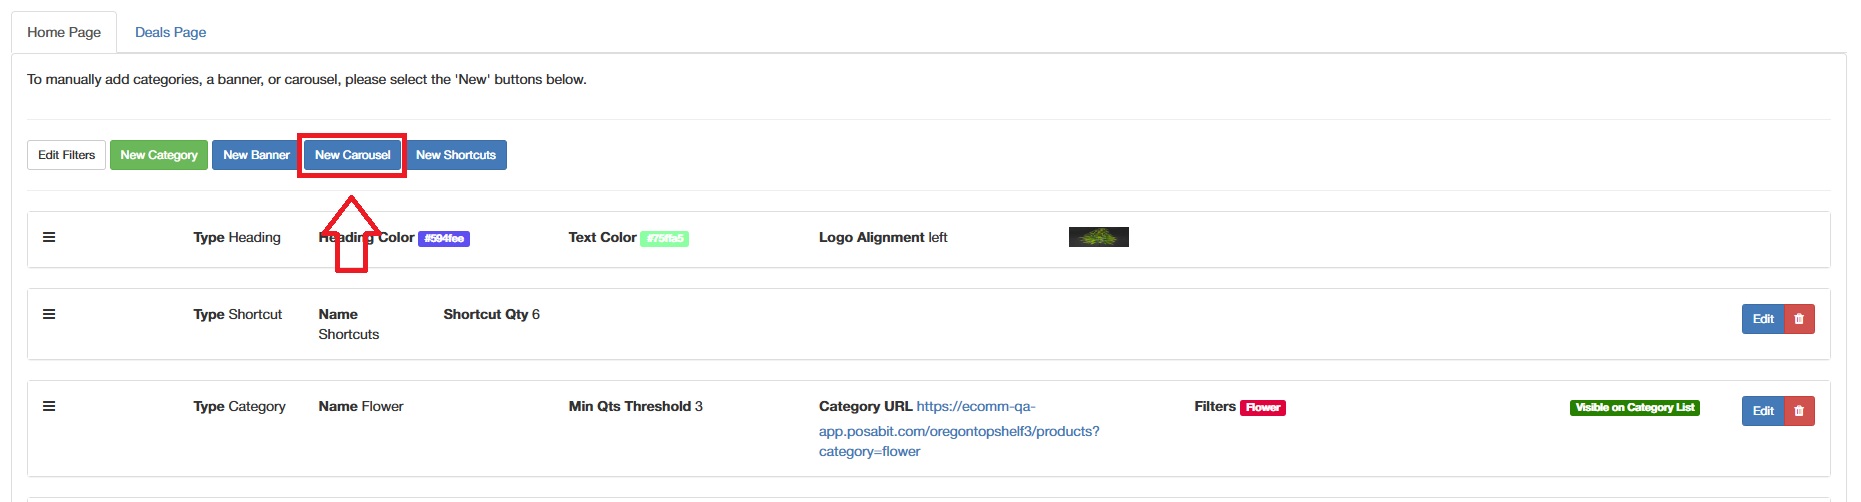
Menu Banners
With POSaBIT's new menu, you will also be able to add menu banners & image carousels to display and can link to different pages. For example, you could display a brand in a carousel and it could link to a page within the menu that would display only products from the selected brand.
Image Carousel
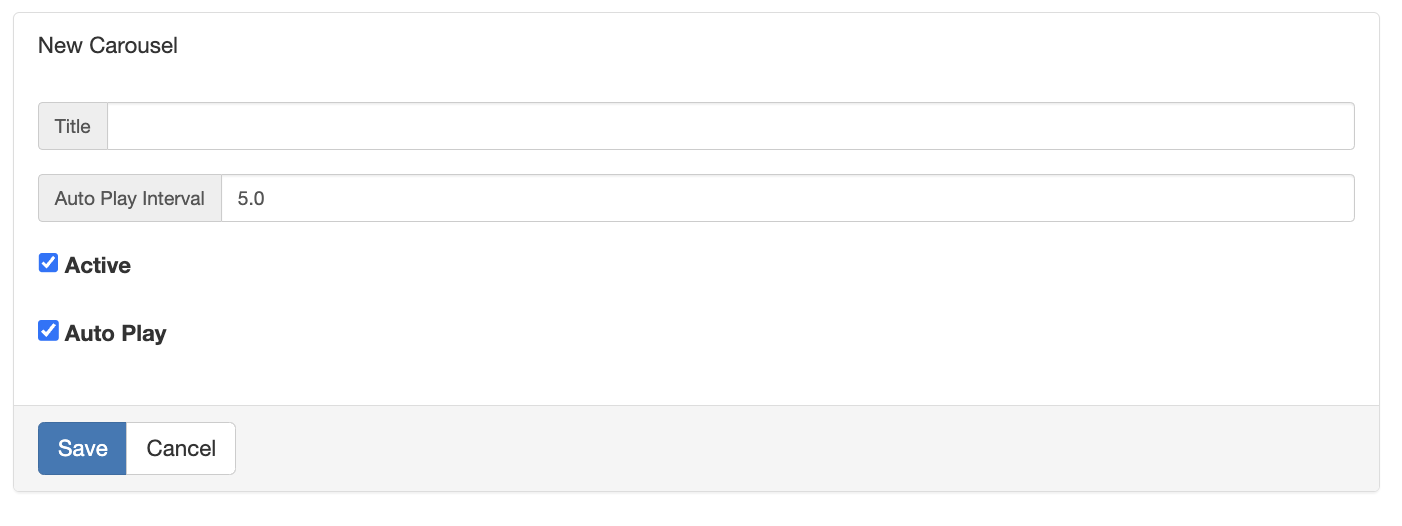
- To add an image carousel, click the blue New Carousel button on the lower left side of the Menu Dashboard
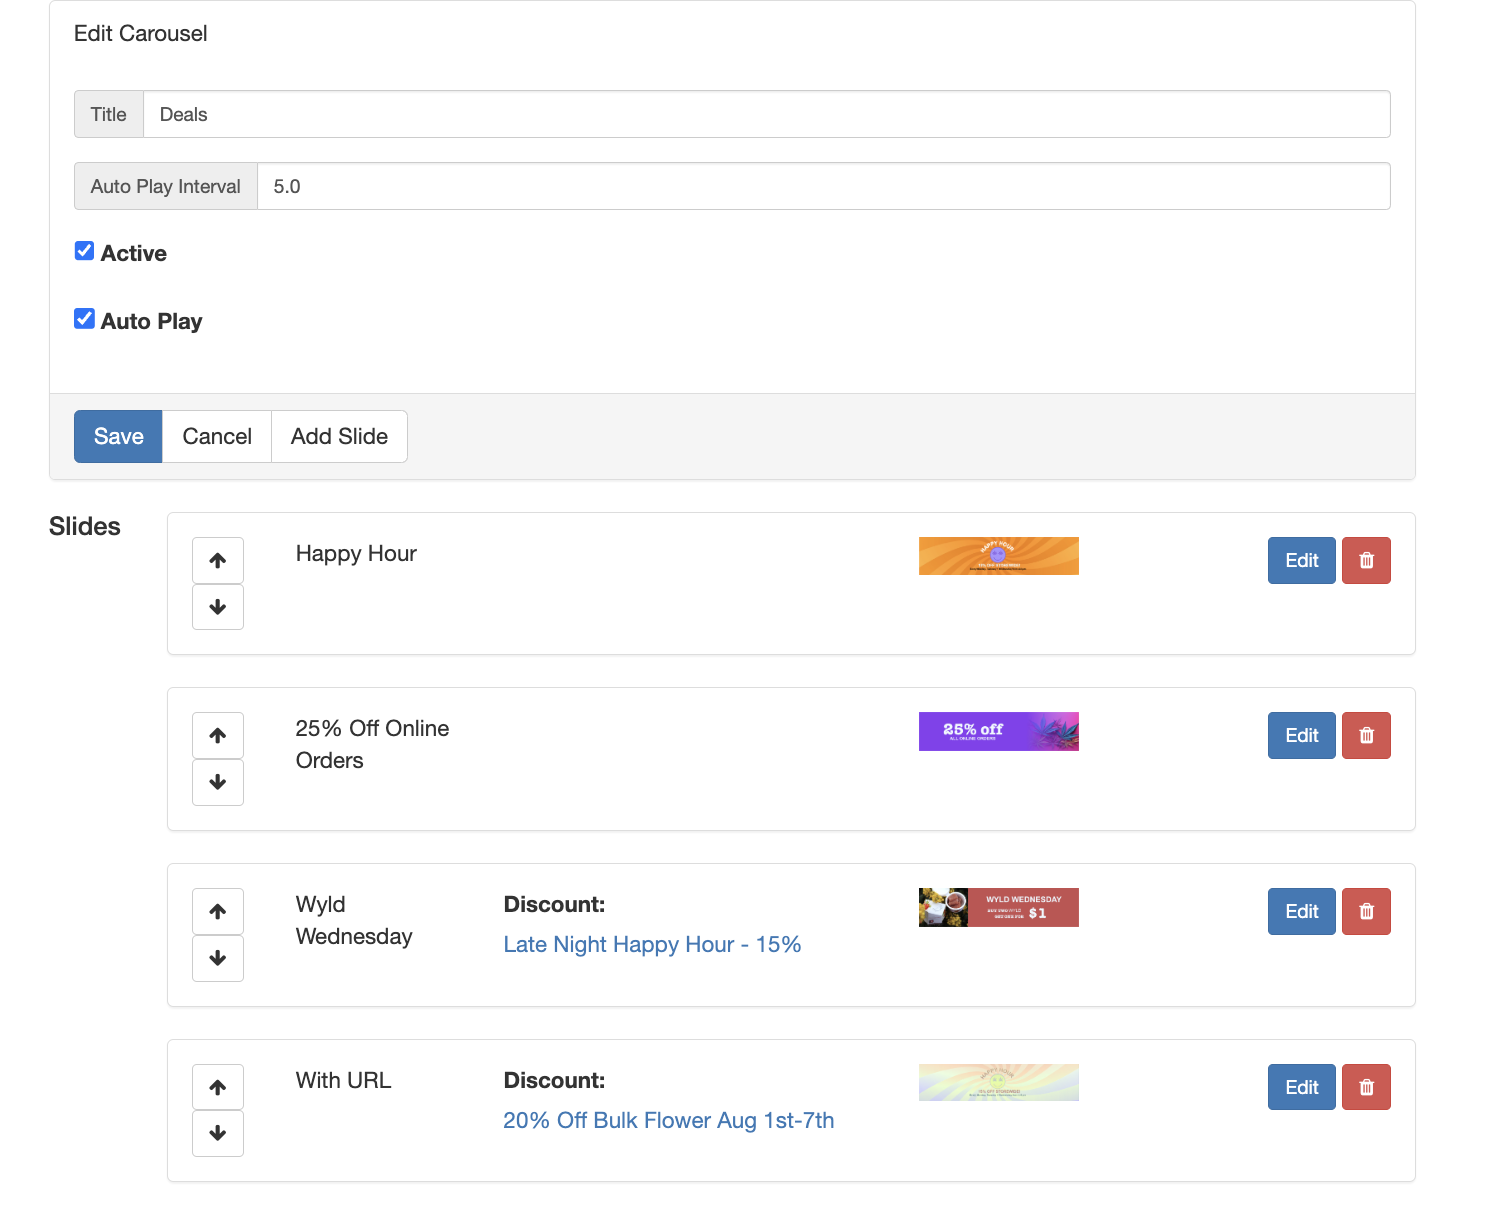
- Fill out the carousel information then click Save
- Once you save it, you will now have a new Add Slide option where you will be able to add the images you want to the image carousel.
- Fill out the information to customize the slide
- Slide Name
- Slide URL - this is where the user will be directed when clicking on the image
- Sync with Discount flag - you can connect the slide to a discount so the slide automatically expires at the time the discount does
- Slide image - select the image file you want to display
- Discount - select the discount you want to associate to the slide (OPTIONAL)
- Start and End day & times (OPTIONAL)
- Days - Select the days you'd like this image to display in the carousel
- Save

- Once you add your assortment of images to the carousel, you will have an overview of the carousel from the Menu Carousels page. From here you can reorder the order the images display, edit, or remove the different images.
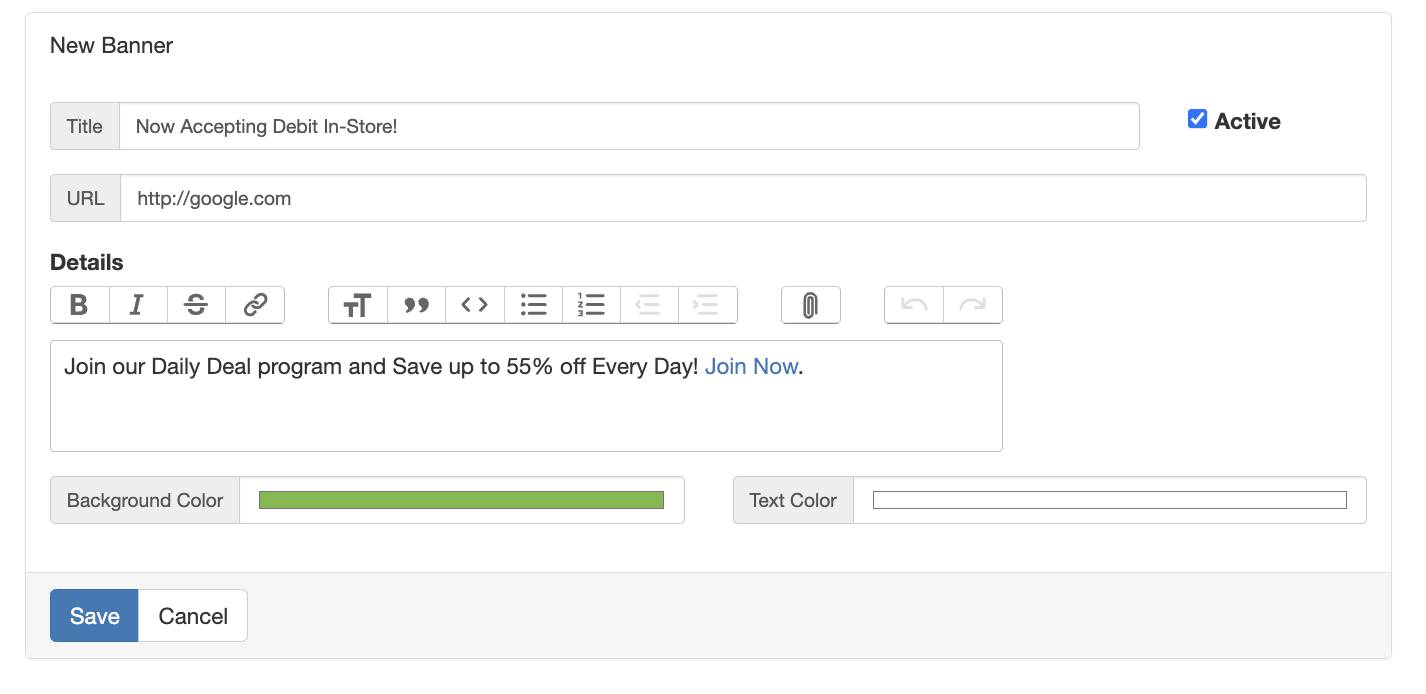
Static Banner
A static banner is something that will display all the time and could be something like a discount that happens daily, or info about your loyalty program.
- From the menu overview page, select the blue New Banner button.
- Fill out the information on the new banner:
- Titile
- URL - this is where it will direct the user when they click on the banner
- Details
- Background Color
- Text Color
- You will be redirected back to the Menu Overview page and can reorder the page by dragging the 3 lines on the left side of each category / banner / image carousel / shortcut.

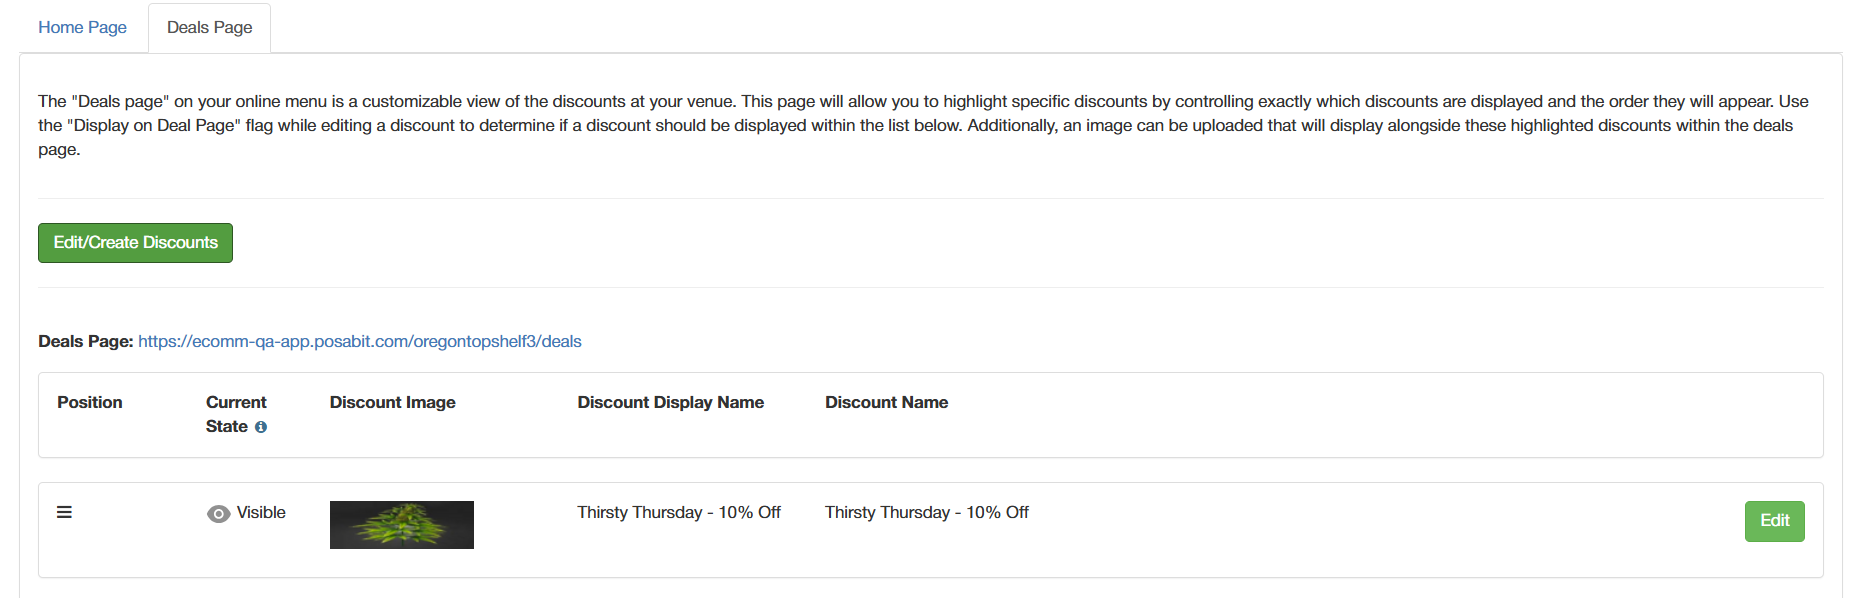
Configure your Deals Page (NEW)
After you have configured your Home page, next you will want to configure the "Deals" page. The deals page contains a list of discounts, allowing users to easily see what discounts (deals) are active and filter on products that fit within that discount.
- From the Menu Dashboard, select the green Deals Page tab at the top of the "Home Page" edit section.

- Within the deals page configuration, you will see the following:
- Edit/Create Discounts: This button will take you to the discounts section of the POS portal in order to edit/create a discount.
- Deals Page URL: Access the URL that will be used for your menu's "Deals Page"
- A list of all current "Discounts" that are set to show on the "Deals Page".By default, all of your discounts will be set to "Display on Menu Deals Page".
- If you wish to edit how a discount appears on the deals page, select "Edit" on that specific discount
- Within the "Discount" edit page:
- Enable/Disable the "Display on Menu Deals Page" to determine if that discount should be included on the deals page or not.
- Upload an "Online Menu Tile Image" to replace the POSaBIT-provided default image that is set automatically (Use 360x120px for best image results)
- Finally, adjust the order of the discounts on the deals page, to set how the order in which the discounts will appear on the menu.
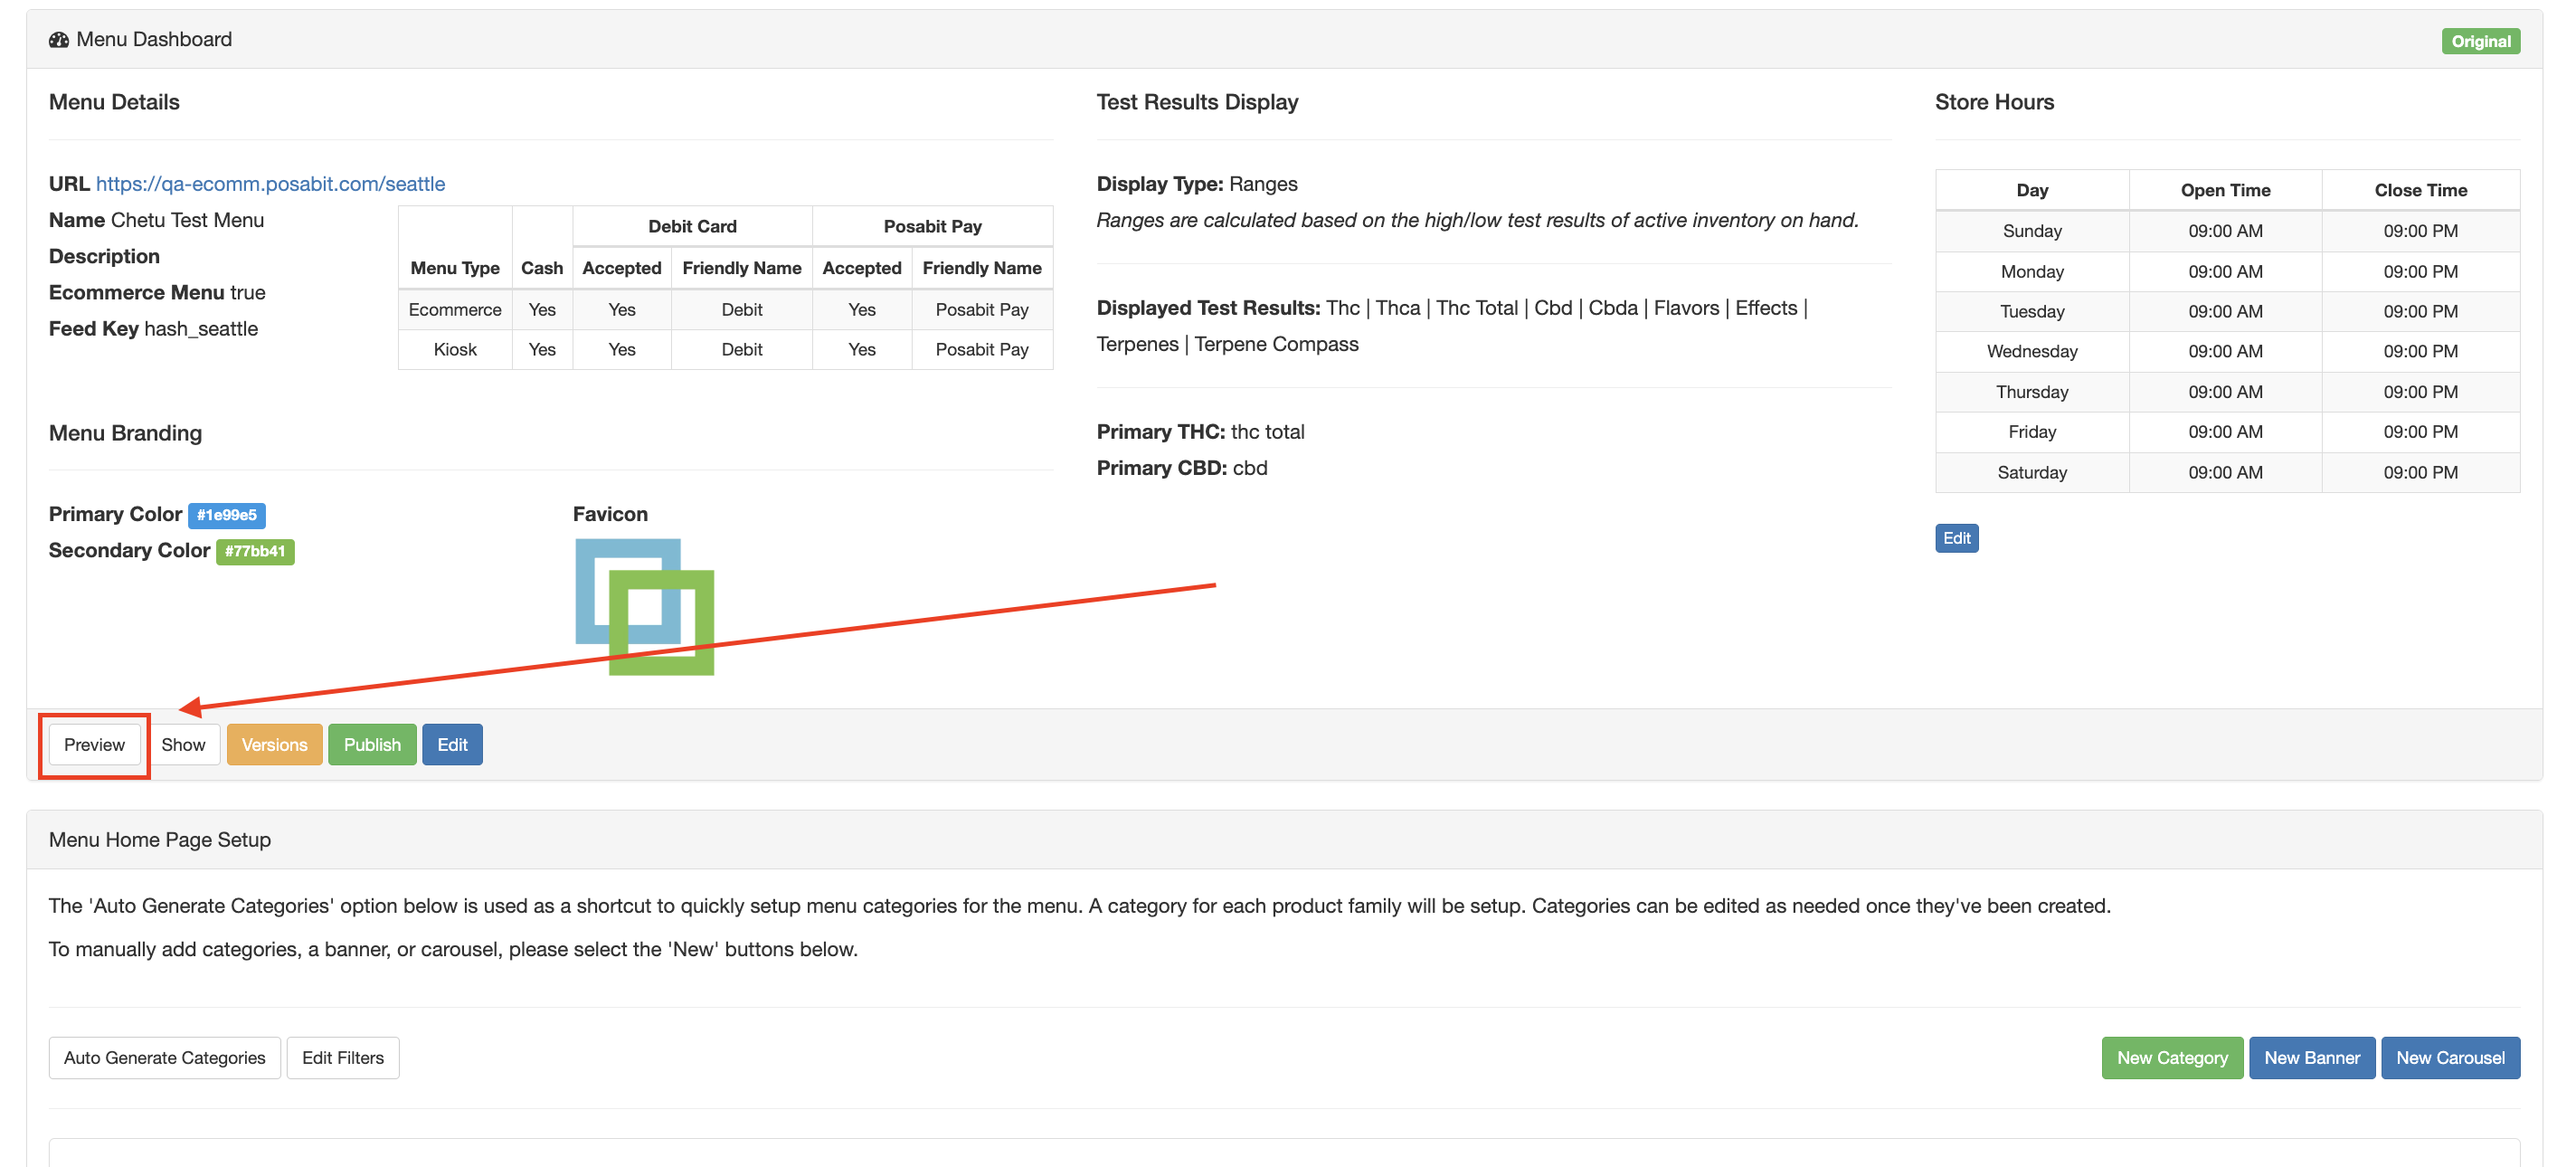
How to Preview a New POSaBIT Menu
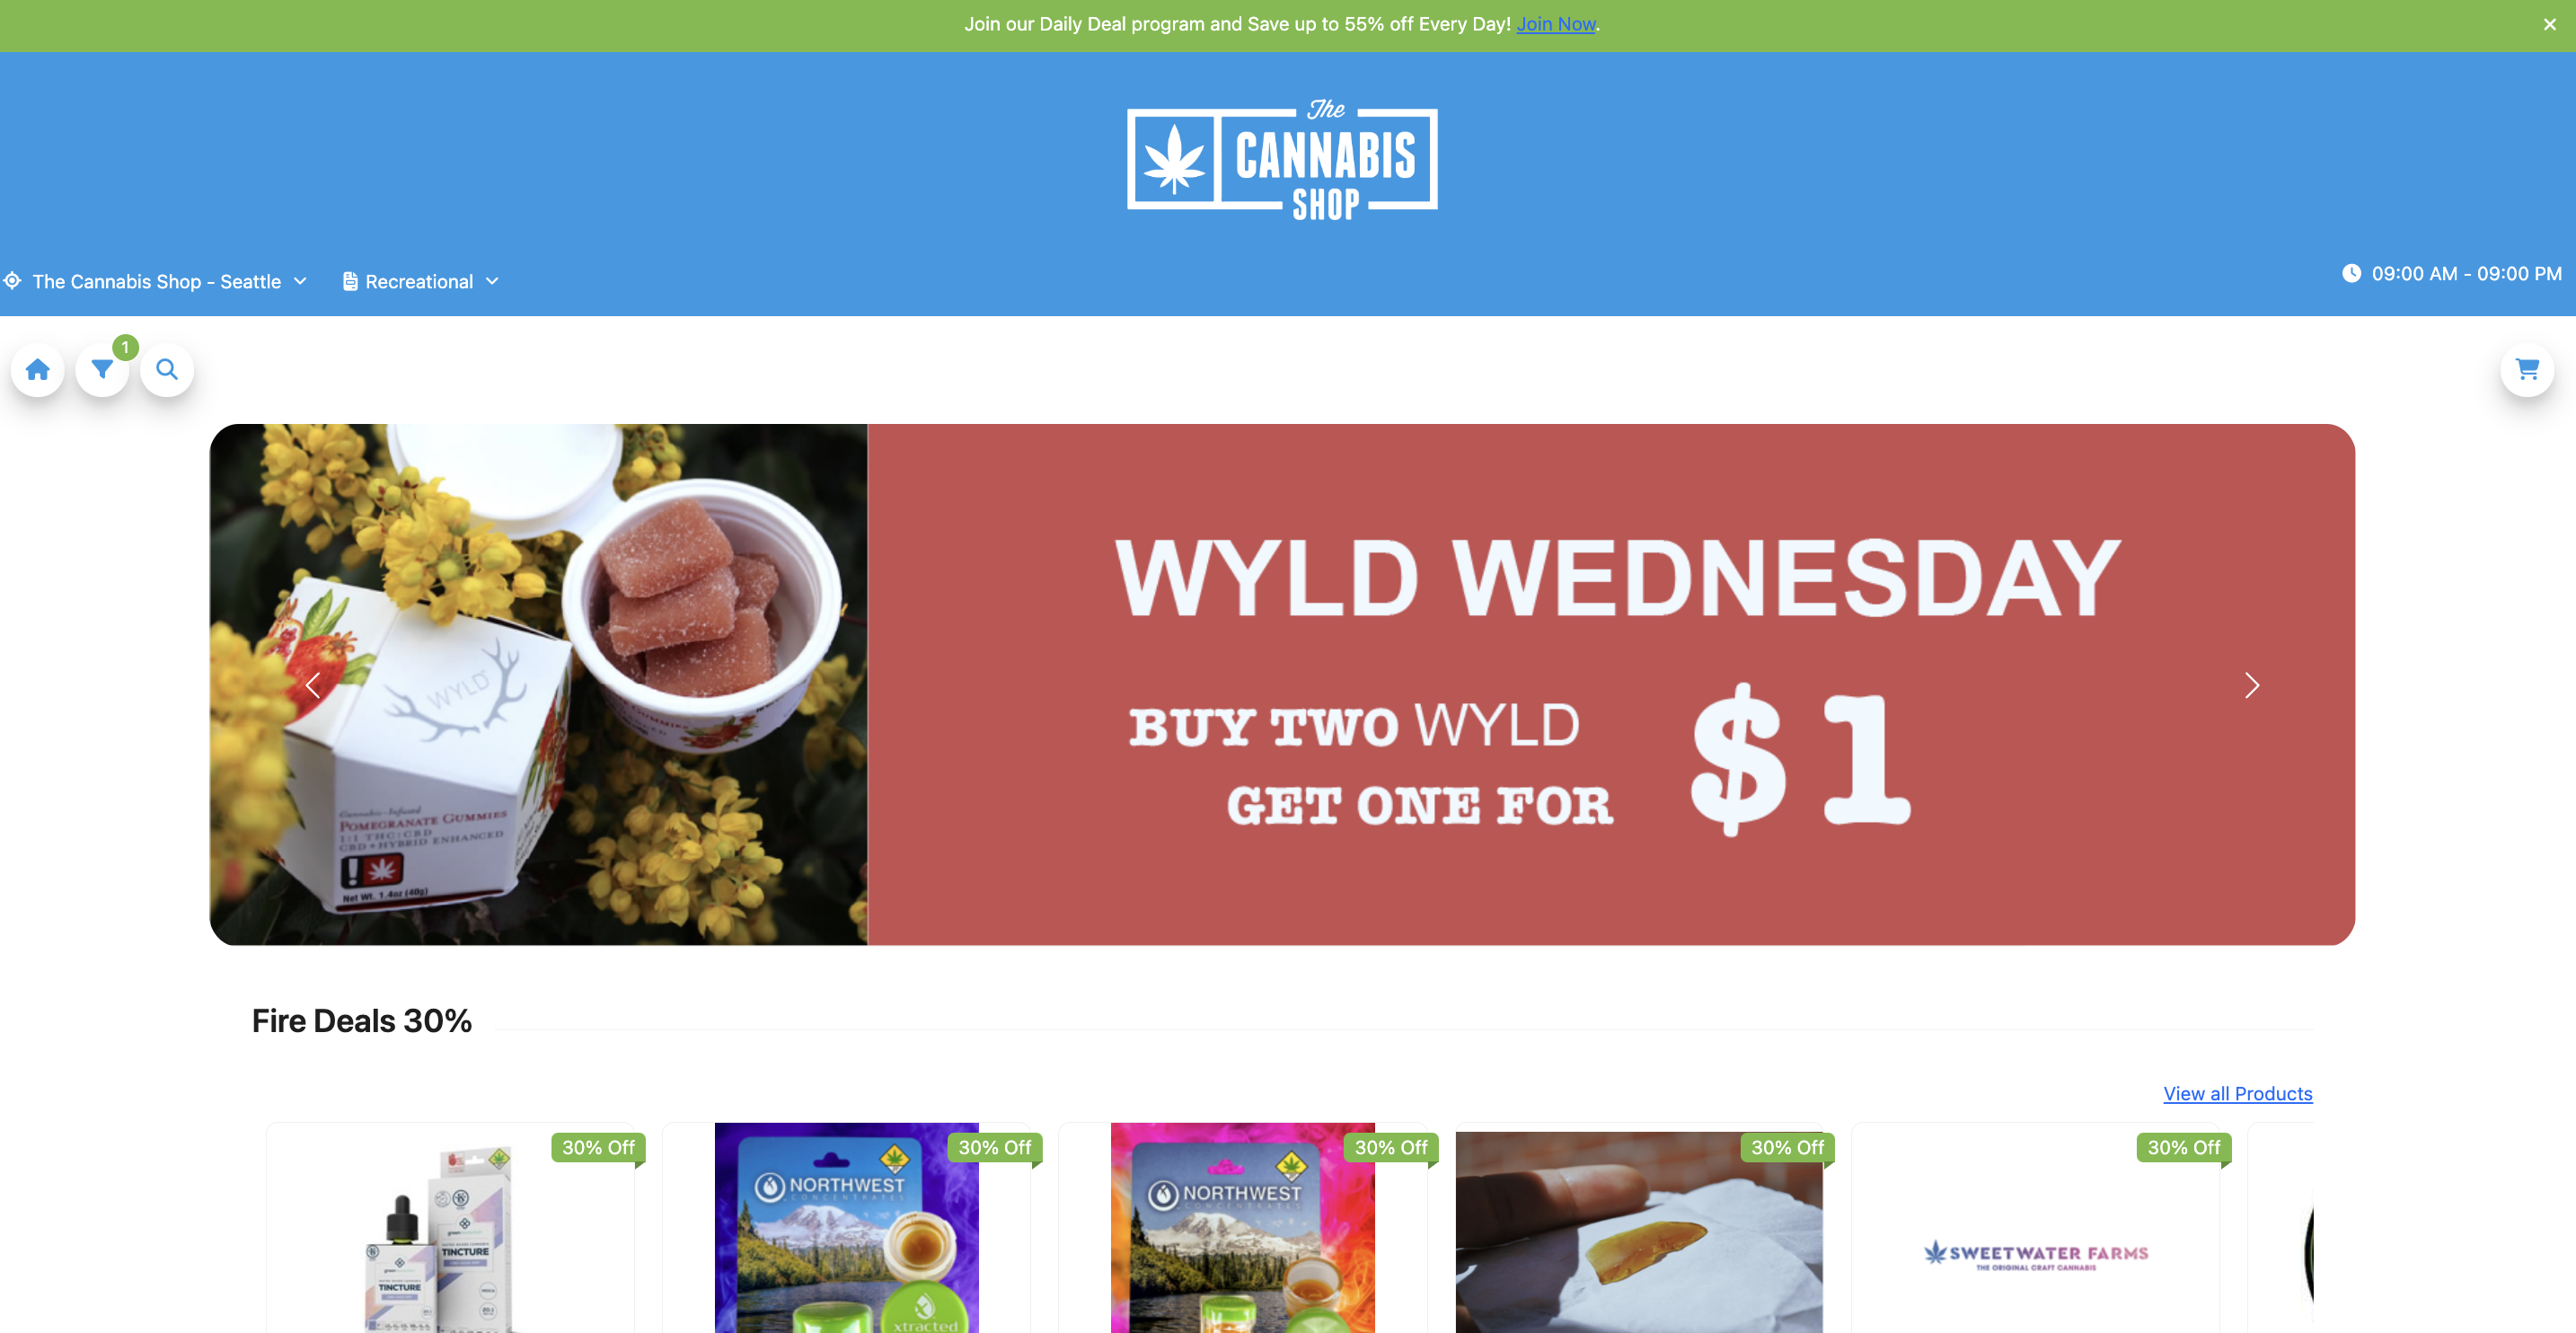
Once you think your menu is in a good place but you want to verify everything looks good before publishing it, you can preview it. To do this, go to the Menu Dashboard page, and select Preview. This will open a new tab with what your menu would look like if it was published.